> ## Documentation Index
> Fetch the complete documentation index at: https://cockroachlabs.mintlify.site/llms.txt
> Use this file to discover all available pages before exploring further.
# Deploy CockroachDB on Red Hat OpenShift
export const InternalLink = ({version, path = "", children, ...props}) => {
let detectedVersion = version || "stable";
if (typeof window !== 'undefined' && !version) {
const match = window.location.pathname.match(/\/docs\/([^/]+)/);
if (match) {
detectedVersion = match[1];
}
}
const normalizedPath = path.startsWith("/") ? path.slice(1) : path;
return
{children}
;
};
This page shows you how to start and stop a secure 3-node CockroachDB cluster on the Red Hat OpenShift platform, using the [CockroachDB Kubernetes Operator](https://marketplace.redhat.com/en-us/products/cockroachdb-operator).
## Before you begin
You must have the following set up before proceeding with this tutorial:
* A running OpenShift cluster
This article assumes you have already installed the OpenShift Container Platform as your Kubernetes cluster. For details on this, see the [OpenShift documentation](https://docs.openshift.com/container-platform/).
## Step 1. Create a CockroachDB namespace
1. Create a `cockroachdb` namespace. You will create the CockroachDB cluster in this namespace:
`oc` runs `kubectl` commands on OpenShift clusters, using the same syntax.
```shell theme={"theme":{"light":"catppuccin-mocha","dark":"catppuccin-mocha"}}
oc create namespace cockroachdb
```
```
namespace/cockroachdb created
```
1. Set `cockroachdb` as the default namespace:
```shell theme={"theme":{"light":"catppuccin-mocha","dark":"catppuccin-mocha"}}
oc config set-context --current --namespace=cockroachdb
```
```
Context "admin" modified.
```
Validate that this was successful:
```shell theme={"theme":{"light":"catppuccin-mocha","dark":"catppuccin-mocha"}}
oc config view --minify | grep namespace:
```
```
namespace: cockroachdb
```
This lets you issue `oc` commands without having to specify the namespace each time.
## Step 2. Install the Operator
1. Navigate to your OpenShift web console and click **OperatorHub**.
2. Enter "cockroach" in the search box. There are two tiles called **CockroachDB Operator**. Find the tile *without* the `Marketplace` label (which requires a subscription).
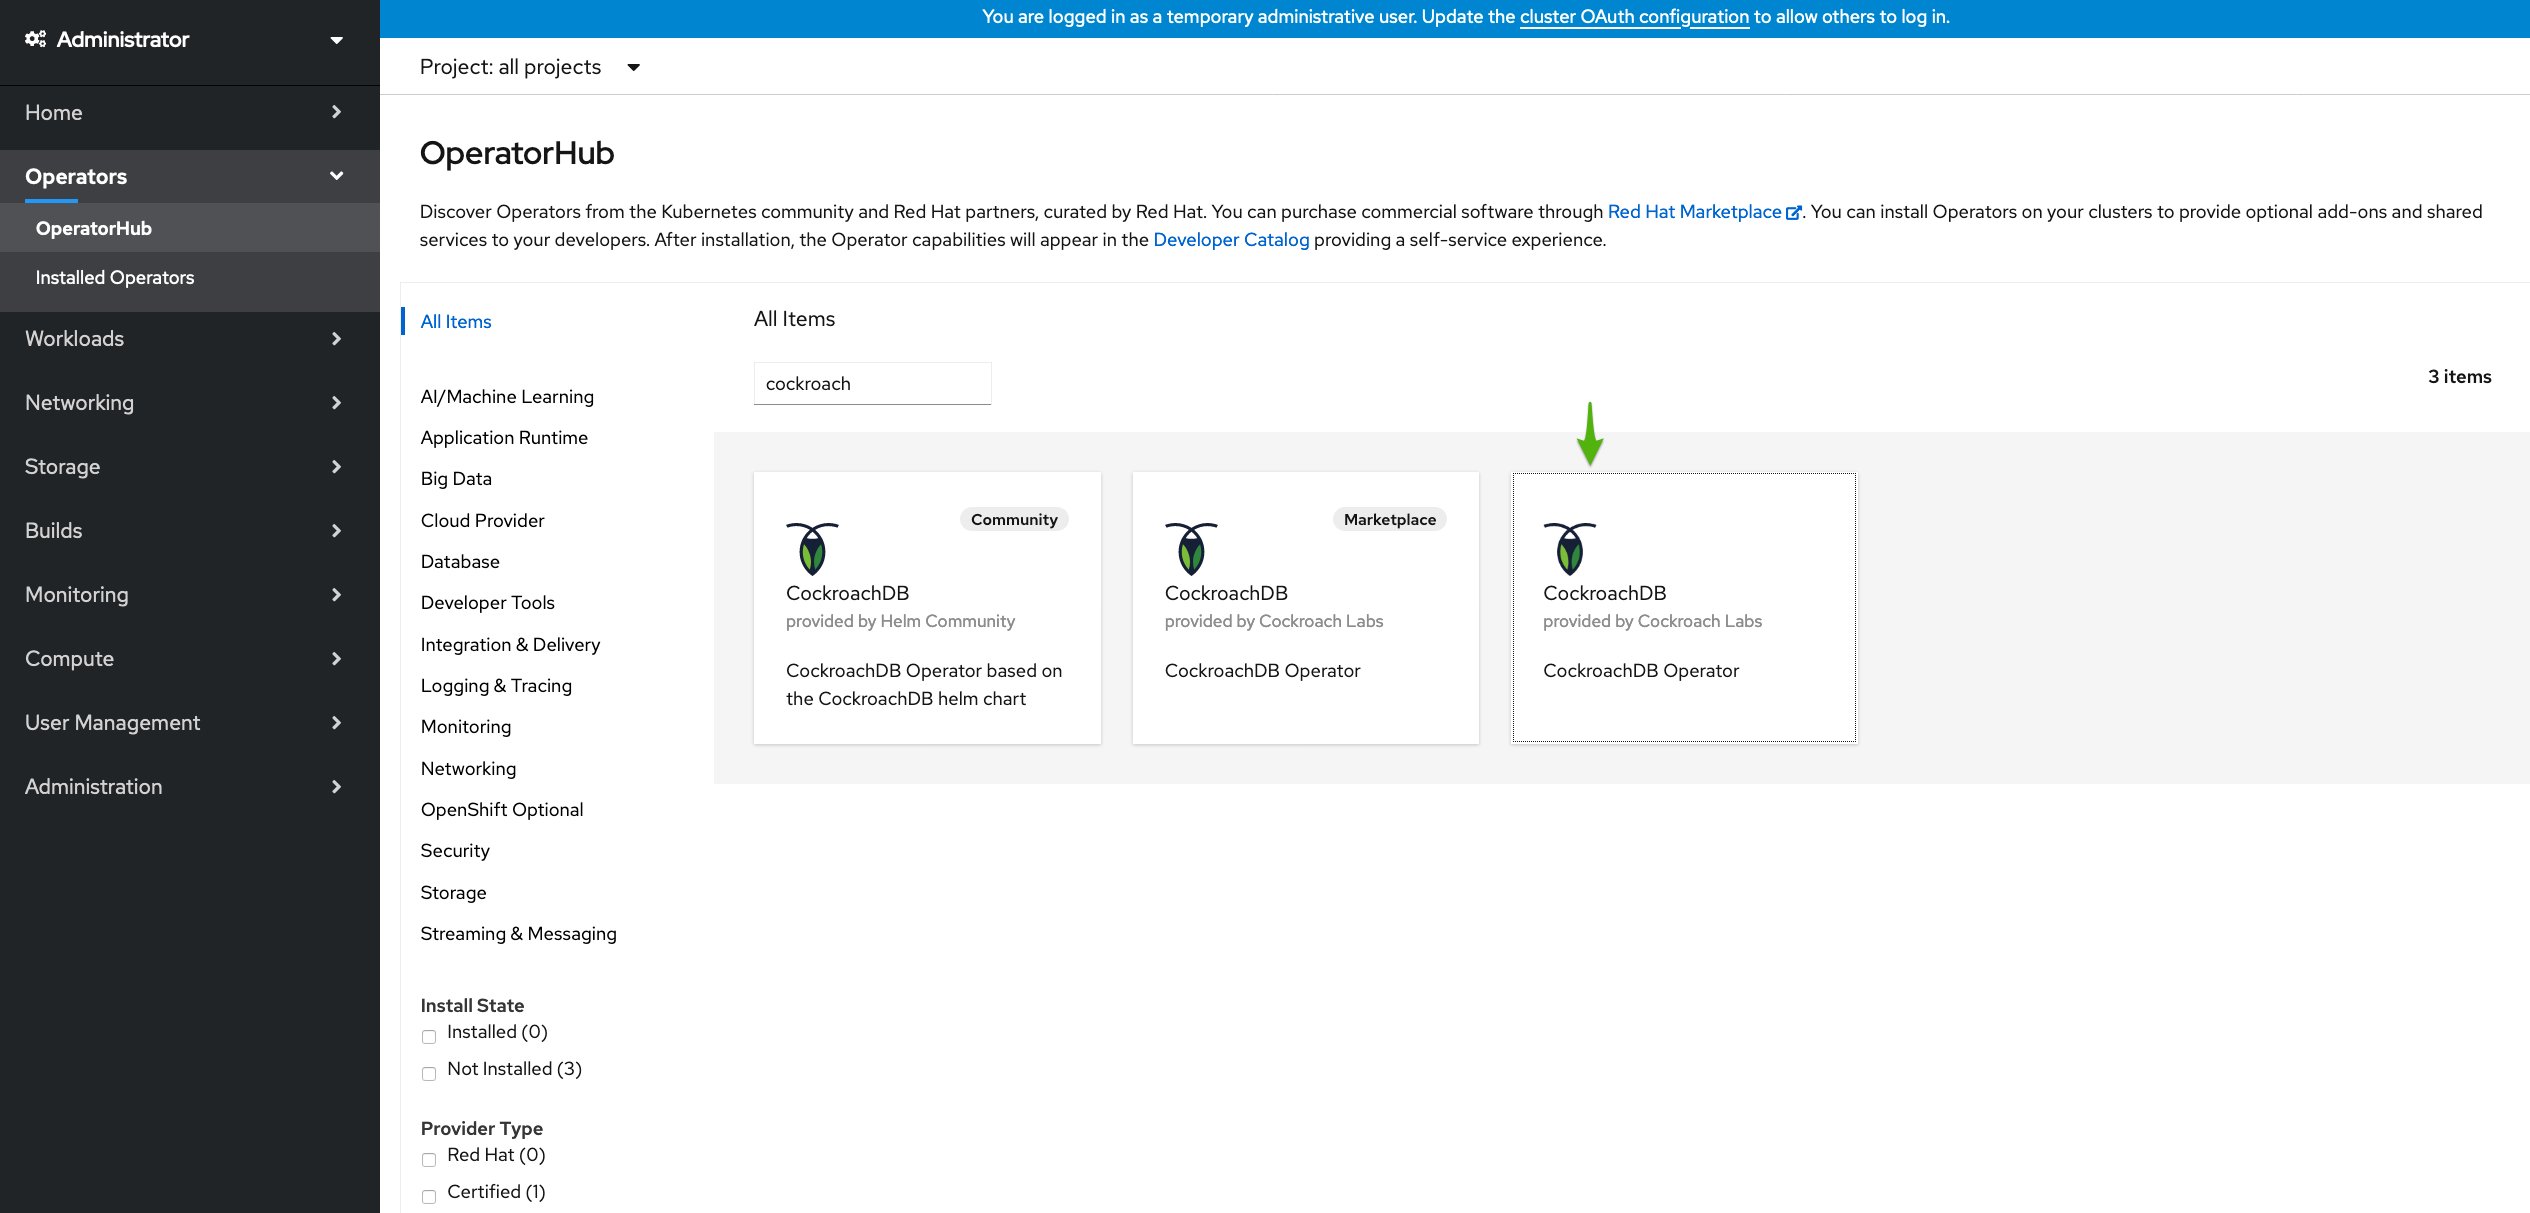 Click the **CockroachDB Operator** tile and then **Install**.
3. On the **Install Operator** page, select `cockroachdb` in the **Installed Namespace** dropdown and click **Install**.
4. Confirm that the Operator is running:
```shell theme={"theme":{"light":"catppuccin-mocha","dark":"catppuccin-mocha"}}
$ oc get pods
```
```
NAME READY STATUS RESTARTS AGE
cockroach-operator-65c4f6df45-h5r5n 1/1 Running 0 51s
```
## Step 3. Start CockroachDB
1. When the Operator is ready, click **View Operator** to navigate to the **Installed Operators** page.
2. In the **CockroachDB Operator** tile, click **Create instance**.
Click the **CockroachDB Operator** tile and then **Install**.
3. On the **Install Operator** page, select `cockroachdb` in the **Installed Namespace** dropdown and click **Install**.
4. Confirm that the Operator is running:
```shell theme={"theme":{"light":"catppuccin-mocha","dark":"catppuccin-mocha"}}
$ oc get pods
```
```
NAME READY STATUS RESTARTS AGE
cockroach-operator-65c4f6df45-h5r5n 1/1 Running 0 51s
```
## Step 3. Start CockroachDB
1. When the Operator is ready, click **View Operator** to navigate to the **Installed Operators** page.
2. In the **CockroachDB Operator** tile, click **Create instance**.
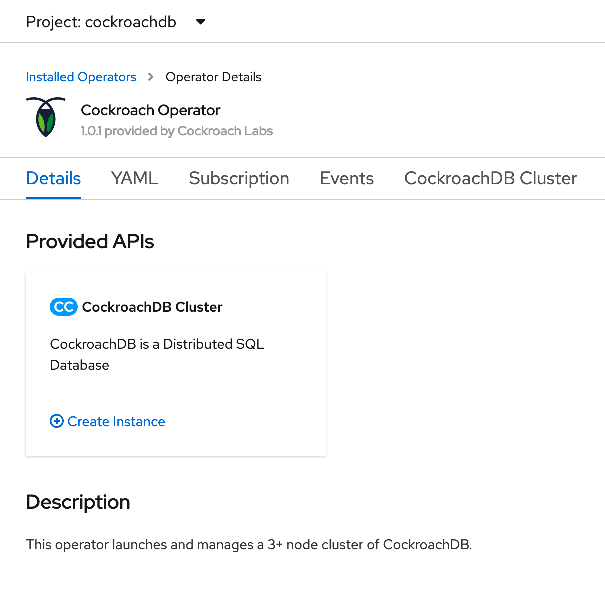 3. Make sure **CockroachDB Version** is set to a valid CockroachDB version. For a list of compatible image names, see `spec.containers.env` in the [Operator manifest](https://raw.github.com/cockroachdb/cockroach-operator/v2.18.3/install/operator.yaml) on GitHub.
4. This will open the **Create CrdbCluster** page. By default, this deploys a 3-node secure cluster. Leave the other fields unchanged and click **Create**.
5. Navigate to **Workloads** > **Pods** and observe the pods being created:
3. Make sure **CockroachDB Version** is set to a valid CockroachDB version. For a list of compatible image names, see `spec.containers.env` in the [Operator manifest](https://raw.github.com/cockroachdb/cockroach-operator/v2.18.3/install/operator.yaml) on GitHub.
4. This will open the **Create CrdbCluster** page. By default, this deploys a 3-node secure cluster. Leave the other fields unchanged and click **Create**.
5. Navigate to **Workloads** > **Pods** and observe the pods being created:
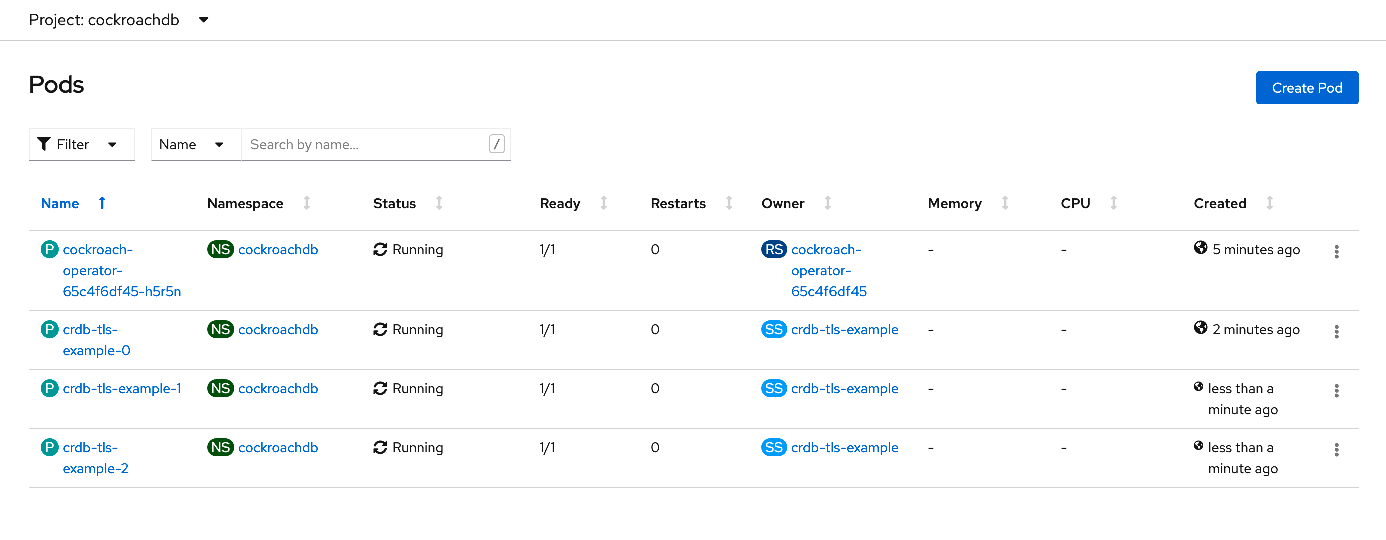 6. You can also use the command line to view the pods:
```shell theme={"theme":{"light":"catppuccin-mocha","dark":"catppuccin-mocha"}}
oc get pods
```
```
NAME READY STATUS RESTARTS AGE
cockroach-operator-65c4f6df45-h5r5n 1/1 Running 0 6m11s
crdb-tls-example-0 1/1 Running 0 3m15s
crdb-tls-example-1 1/1 Running 0 103s
crdb-tls-example-2 1/1 Running 0 89s
```
## Step 4. Create a secure client pod
To use the CockroachDB SQL client, first launch a secure pod running the `cockroach` binary.
This can be defined with the following YAML, which mounts the Operator's generated certificates:
`spec.containers.image` should match the **Image** value that is displayed under the **Containers** section on the **Pods** page when you select a CockroachDB pod. Be sure to select a CockroachDB pod and not the Operator pod.
Note that OpenShift may display the image SHA instead of the tag. In this case, you should use the SHA for `spec.containers.image`.
```yaml theme={"theme":{"light":"catppuccin-mocha","dark":"catppuccin-mocha"}}
apiVersion: v1
kind: Pod
metadata:
name: crdb-client-secure
labels:
app.kubernetes.io/component: database
app.kubernetes.io/instance: crdb-tls-example
app.kubernetes.io/name: cockroachdb
spec:
serviceAccountName: cockroach-operator-sa
containers:
- name: crdb-client-secure
image: registry.connect.redhat.com/cockroachdb/cockroach:v20.2.8
imagePullPolicy: IfNotPresent
volumeMounts:
- name: client-certs
mountPath: /cockroach/cockroach-certs/
command:
- sleep
- "2147483648" # 2^31
terminationGracePeriodSeconds: 0
volumes:
- name: client-certs
projected:
sources:
- secret:
name: crdb-tls-example-node
items:
- key: ca.crt
path: ca.crt
- secret:
name: crdb-tls-example-root
items:
- key: tls.crt
path: client.root.crt
- key: tls.key
path: client.root.key
defaultMode: 256
```
1. On the **Pods** page, click **Create Pod** and replace the existing YAML with the above manifest.
2. Click **Create**. Return to the **Pods** page and check that the client pod `crdb-client-secure` is running. This is also visible on the command-line:
```shell theme={"theme":{"light":"catppuccin-mocha","dark":"catppuccin-mocha"}}
oc get pods
```
```
NAME READY STATUS RESTARTS AGE
cockroach-operator-65c4f6df45-h5r5n 1/1 Running 0 6m11s
crdb-client-secure 1/1 Running 0 14m
crdb-tls-example-0 1/1 Running 0 3m15s
crdb-tls-example-1 1/1 Running 0 103s
crdb-tls-example-2 1/1 Running 0 89s
```
## Step 5. Use the CockroachDB SQL client
1. Start the CockroachDB built-in SQL client from the client pod:
```shell theme={"theme":{"light":"catppuccin-mocha","dark":"catppuccin-mocha"}}
oc exec -it crdb-client-secure -- ./cockroach sql --certs-dir=/cockroach/cockroach-certs/ --host=crdb-tls-example-public
```
```
#
# Welcome to the CockroachDB SQL shell.
# All statements must be terminated by a semicolon.
# To exit, type: \q.
#
# Server version: CockroachDB CCL v20.2.8 (x86_64-unknown-linux-gnu, built 2021/04/23 13:54:57, go1.13.14) (same version as client)
# Cluster ID: 0813c343-c86b-4be8-9ad0-477cdb5db749
#
# Enter \? for a brief introduction.
#
root@crdb-tls-example-public:26257/defaultdb>
```
Now you can run SQL commands against the cluster.
2. Run some basic CockroachDB SQL statements:
```sql theme={"theme":{"light":"catppuccin-mocha","dark":"catppuccin-mocha"}}
> CREATE DATABASE bank;
```
```sql theme={"theme":{"light":"catppuccin-mocha","dark":"catppuccin-mocha"}}
> CREATE TABLE bank.accounts (id INT PRIMARY KEY, balance DECIMAL);
```
```sql theme={"theme":{"light":"catppuccin-mocha","dark":"catppuccin-mocha"}}
> INSERT INTO bank.accounts VALUES (1, 1000.50);
```
```sql theme={"theme":{"light":"catppuccin-mocha","dark":"catppuccin-mocha"}}
> SELECT * FROM bank.accounts;
```
```
id | balance
+----+---------+
1 | 1000.50
(1 row)
```
3. Create a user with a password:
```sql theme={"theme":{"light":"catppuccin-mocha","dark":"catppuccin-mocha"}}
> CREATE USER roach WITH PASSWORD 'Q7gc8rEdS';
```
You will need this username and password to access the DB Console later.
4. Exit the SQL shell and pod:
```sql theme={"theme":{"light":"catppuccin-mocha","dark":"catppuccin-mocha"}}
> \q
```
**Note:** If you cannot access the SQL client, this may be related to your `--certs-dir` or `--host` flags.
1. Shell into the client pod and check for the necessary certs in the `--certs-dir` directory:
You can also access the client pod by selecting it on the **Pods** page and clicking **Terminal**.
```shell theme={"theme":{"light":"catppuccin-mocha","dark":"catppuccin-mocha"}}
oc exec -it crdb-client-secure sh
```
```shell theme={"theme":{"light":"catppuccin-mocha","dark":"catppuccin-mocha"}}
# cd /cockroach/cockroach-certs
# ls
```
```
ca.crt client.root.key
client.root.crt
```
1. Check the name of the `public` service to use with the `--host` flag:
```shell theme={"theme":{"light":"catppuccin-mocha","dark":"catppuccin-mocha"}}
oc get services
```
```shell theme={"theme":{"light":"catppuccin-mocha","dark":"catppuccin-mocha"}}
NAME TYPE CLUSTER-IP EXTERNAL-IP PORT(S) AGE
crdb-tls-example ClusterIP None 26257/TCP,8080/TCP 14m
crdb-tls-example-public ClusterIP 172.25.180.197 26257/TCP,8080/TCP 14m
```
## Step 6. Access the DB Console
To access the CockroachDB cluster's DB Console:
1. On secure clusters, certain pages of the DB Console can only be accessed by `admin` users.
Start the CockroachDB built-in SQL client from the client pod:
```shell theme={"theme":{"light":"catppuccin-mocha","dark":"catppuccin-mocha"}}
oc exec -it crdb-client-secure -- ./cockroach sql --certs-dir=/cockroach/cockroach-certs/ --host=crdb-tls-example-public
```
2. Assign `roach` to the `admin` role (you only need to do this once):
```sql theme={"theme":{"light":"catppuccin-mocha","dark":"catppuccin-mocha"}}
> GRANT admin TO roach;
```
3. Exit the SQL shell and pod:
```sql theme={"theme":{"light":"catppuccin-mocha","dark":"catppuccin-mocha"}}
> \q
```
4. In a new terminal window, port-forward from your local machine to the `crdb-tls-example-public` service:
```shell theme={"theme":{"light":"catppuccin-mocha","dark":"catppuccin-mocha"}}
oc port-forward service/crdb-tls-example-public 8080
```
```
Forwarding from [::1]:8080 -> 8080
```
5. Go to [https://localhost:8080](https://localhost:8080) and log in with the username and password you created earlier.
If you are using Google Chrome, and you are getting an error about not being able to reach `localhost` because its certificate has been revoked, go to chrome://flags/#allow-insecure-localhost, enable "Allow invalid certificates for resources loaded from localhost", and then restart the browser. Enabling this Chrome feature degrades security for all sites running on `localhost`, not just CockroachDB's DB Console, so be sure to enable the feature only temporarily.
## Step 7. Run a sample workload
To run a sample CockroachDB workload:
1. Use the secure client pod to load the `movr` schema on one of the CockroachDB pods:
```shell theme={"theme":{"light":"catppuccin-mocha","dark":"catppuccin-mocha"}}
oc exec -it crdb-client-secure -- ./cockroach workload init movr 'postgresql://root@crdb-tls-example-0.crdb-tls-example.cockroachdb:26257?sslcert=%2Fcockroach%2Fcockroach-certs%2Fclient.root.crt&sslkey=%2Fcockroach%2Fcockroach-certs%2Fclient.root.key&sslmode=verify-full&sslrootcert=%2Fcockroach%2Fcockroach-certs%2Fca.crt'
```
2. Initialize and run the workload for 3 minutes:
```shell theme={"theme":{"light":"catppuccin-mocha","dark":"catppuccin-mocha"}}
oc exec -it crdb-client-secure -- ./cockroach workload run movr --duration=3m --tolerate-errors --max-rate=20 --concurrency=1 --display-every=10s 'postgresql://root@crdb-tls-example-0.crdb-tls-example.cockroachdb:26257?sslcert=%2Fcockroach%2Fcockroach-certs%2Fclient.root.crt&sslkey=%2Fcockroach%2Fcockroach-certs%2Fclient.root.key&sslmode=verify-full&sslrootcert=%2Fcockroach%2Fcockroach-certs%2Fca.crt'
```
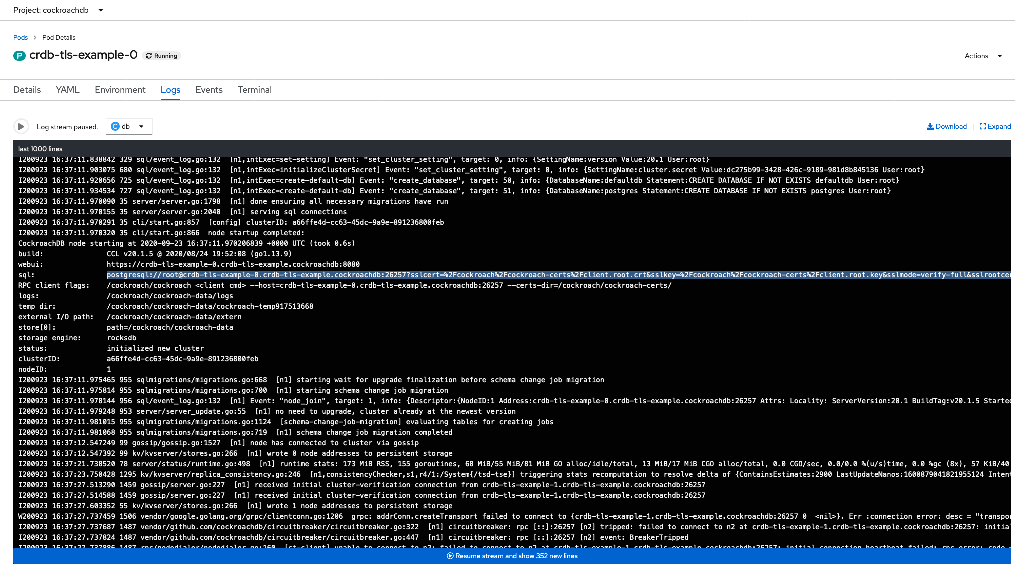
3. Select one of the CockroachDB pods on the **Pods** page and click **Logs**. This will reveal the JDBC URL that your application can use to connect to CockroachDB:
6. You can also use the command line to view the pods:
```shell theme={"theme":{"light":"catppuccin-mocha","dark":"catppuccin-mocha"}}
oc get pods
```
```
NAME READY STATUS RESTARTS AGE
cockroach-operator-65c4f6df45-h5r5n 1/1 Running 0 6m11s
crdb-tls-example-0 1/1 Running 0 3m15s
crdb-tls-example-1 1/1 Running 0 103s
crdb-tls-example-2 1/1 Running 0 89s
```
## Step 4. Create a secure client pod
To use the CockroachDB SQL client, first launch a secure pod running the `cockroach` binary.
This can be defined with the following YAML, which mounts the Operator's generated certificates:
`spec.containers.image` should match the **Image** value that is displayed under the **Containers** section on the **Pods** page when you select a CockroachDB pod. Be sure to select a CockroachDB pod and not the Operator pod.
Note that OpenShift may display the image SHA instead of the tag. In this case, you should use the SHA for `spec.containers.image`.
```yaml theme={"theme":{"light":"catppuccin-mocha","dark":"catppuccin-mocha"}}
apiVersion: v1
kind: Pod
metadata:
name: crdb-client-secure
labels:
app.kubernetes.io/component: database
app.kubernetes.io/instance: crdb-tls-example
app.kubernetes.io/name: cockroachdb
spec:
serviceAccountName: cockroach-operator-sa
containers:
- name: crdb-client-secure
image: registry.connect.redhat.com/cockroachdb/cockroach:v20.2.8
imagePullPolicy: IfNotPresent
volumeMounts:
- name: client-certs
mountPath: /cockroach/cockroach-certs/
command:
- sleep
- "2147483648" # 2^31
terminationGracePeriodSeconds: 0
volumes:
- name: client-certs
projected:
sources:
- secret:
name: crdb-tls-example-node
items:
- key: ca.crt
path: ca.crt
- secret:
name: crdb-tls-example-root
items:
- key: tls.crt
path: client.root.crt
- key: tls.key
path: client.root.key
defaultMode: 256
```
1. On the **Pods** page, click **Create Pod** and replace the existing YAML with the above manifest.
2. Click **Create**. Return to the **Pods** page and check that the client pod `crdb-client-secure` is running. This is also visible on the command-line:
```shell theme={"theme":{"light":"catppuccin-mocha","dark":"catppuccin-mocha"}}
oc get pods
```
```
NAME READY STATUS RESTARTS AGE
cockroach-operator-65c4f6df45-h5r5n 1/1 Running 0 6m11s
crdb-client-secure 1/1 Running 0 14m
crdb-tls-example-0 1/1 Running 0 3m15s
crdb-tls-example-1 1/1 Running 0 103s
crdb-tls-example-2 1/1 Running 0 89s
```
## Step 5. Use the CockroachDB SQL client
1. Start the CockroachDB built-in SQL client from the client pod:
```shell theme={"theme":{"light":"catppuccin-mocha","dark":"catppuccin-mocha"}}
oc exec -it crdb-client-secure -- ./cockroach sql --certs-dir=/cockroach/cockroach-certs/ --host=crdb-tls-example-public
```
```
#
# Welcome to the CockroachDB SQL shell.
# All statements must be terminated by a semicolon.
# To exit, type: \q.
#
# Server version: CockroachDB CCL v20.2.8 (x86_64-unknown-linux-gnu, built 2021/04/23 13:54:57, go1.13.14) (same version as client)
# Cluster ID: 0813c343-c86b-4be8-9ad0-477cdb5db749
#
# Enter \? for a brief introduction.
#
root@crdb-tls-example-public:26257/defaultdb>
```
Now you can run SQL commands against the cluster.
2. Run some basic CockroachDB SQL statements:
```sql theme={"theme":{"light":"catppuccin-mocha","dark":"catppuccin-mocha"}}
> CREATE DATABASE bank;
```
```sql theme={"theme":{"light":"catppuccin-mocha","dark":"catppuccin-mocha"}}
> CREATE TABLE bank.accounts (id INT PRIMARY KEY, balance DECIMAL);
```
```sql theme={"theme":{"light":"catppuccin-mocha","dark":"catppuccin-mocha"}}
> INSERT INTO bank.accounts VALUES (1, 1000.50);
```
```sql theme={"theme":{"light":"catppuccin-mocha","dark":"catppuccin-mocha"}}
> SELECT * FROM bank.accounts;
```
```
id | balance
+----+---------+
1 | 1000.50
(1 row)
```
3. Create a user with a password:
```sql theme={"theme":{"light":"catppuccin-mocha","dark":"catppuccin-mocha"}}
> CREATE USER roach WITH PASSWORD 'Q7gc8rEdS';
```
You will need this username and password to access the DB Console later.
4. Exit the SQL shell and pod:
```sql theme={"theme":{"light":"catppuccin-mocha","dark":"catppuccin-mocha"}}
> \q
```
**Note:** If you cannot access the SQL client, this may be related to your `--certs-dir` or `--host` flags.
1. Shell into the client pod and check for the necessary certs in the `--certs-dir` directory:
You can also access the client pod by selecting it on the **Pods** page and clicking **Terminal**.
```shell theme={"theme":{"light":"catppuccin-mocha","dark":"catppuccin-mocha"}}
oc exec -it crdb-client-secure sh
```
```shell theme={"theme":{"light":"catppuccin-mocha","dark":"catppuccin-mocha"}}
# cd /cockroach/cockroach-certs
# ls
```
```
ca.crt client.root.key
client.root.crt
```
1. Check the name of the `public` service to use with the `--host` flag:
```shell theme={"theme":{"light":"catppuccin-mocha","dark":"catppuccin-mocha"}}
oc get services
```
```shell theme={"theme":{"light":"catppuccin-mocha","dark":"catppuccin-mocha"}}
NAME TYPE CLUSTER-IP EXTERNAL-IP PORT(S) AGE
crdb-tls-example ClusterIP None 26257/TCP,8080/TCP 14m
crdb-tls-example-public ClusterIP 172.25.180.197 26257/TCP,8080/TCP 14m
```
## Step 6. Access the DB Console
To access the CockroachDB cluster's DB Console:
1. On secure clusters, certain pages of the DB Console can only be accessed by `admin` users.
Start the CockroachDB built-in SQL client from the client pod:
```shell theme={"theme":{"light":"catppuccin-mocha","dark":"catppuccin-mocha"}}
oc exec -it crdb-client-secure -- ./cockroach sql --certs-dir=/cockroach/cockroach-certs/ --host=crdb-tls-example-public
```
2. Assign `roach` to the `admin` role (you only need to do this once):
```sql theme={"theme":{"light":"catppuccin-mocha","dark":"catppuccin-mocha"}}
> GRANT admin TO roach;
```
3. Exit the SQL shell and pod:
```sql theme={"theme":{"light":"catppuccin-mocha","dark":"catppuccin-mocha"}}
> \q
```
4. In a new terminal window, port-forward from your local machine to the `crdb-tls-example-public` service:
```shell theme={"theme":{"light":"catppuccin-mocha","dark":"catppuccin-mocha"}}
oc port-forward service/crdb-tls-example-public 8080
```
```
Forwarding from [::1]:8080 -> 8080
```
5. Go to [https://localhost:8080](https://localhost:8080) and log in with the username and password you created earlier.
If you are using Google Chrome, and you are getting an error about not being able to reach `localhost` because its certificate has been revoked, go to chrome://flags/#allow-insecure-localhost, enable "Allow invalid certificates for resources loaded from localhost", and then restart the browser. Enabling this Chrome feature degrades security for all sites running on `localhost`, not just CockroachDB's DB Console, so be sure to enable the feature only temporarily.
## Step 7. Run a sample workload
To run a sample CockroachDB workload:
1. Use the secure client pod to load the `movr` schema on one of the CockroachDB pods:
```shell theme={"theme":{"light":"catppuccin-mocha","dark":"catppuccin-mocha"}}
oc exec -it crdb-client-secure -- ./cockroach workload init movr 'postgresql://root@crdb-tls-example-0.crdb-tls-example.cockroachdb:26257?sslcert=%2Fcockroach%2Fcockroach-certs%2Fclient.root.crt&sslkey=%2Fcockroach%2Fcockroach-certs%2Fclient.root.key&sslmode=verify-full&sslrootcert=%2Fcockroach%2Fcockroach-certs%2Fca.crt'
```
2. Initialize and run the workload for 3 minutes:
```shell theme={"theme":{"light":"catppuccin-mocha","dark":"catppuccin-mocha"}}
oc exec -it crdb-client-secure -- ./cockroach workload run movr --duration=3m --tolerate-errors --max-rate=20 --concurrency=1 --display-every=10s 'postgresql://root@crdb-tls-example-0.crdb-tls-example.cockroachdb:26257?sslcert=%2Fcockroach%2Fcockroach-certs%2Fclient.root.crt&sslkey=%2Fcockroach%2Fcockroach-certs%2Fclient.root.key&sslmode=verify-full&sslrootcert=%2Fcockroach%2Fcockroach-certs%2Fca.crt'
```
3. Select one of the CockroachDB pods on the **Pods** page and click **Logs**. This will reveal the JDBC URL that your application can use to connect to CockroachDB:
 ## Step 8. Delete the cluster
If you want to continue using this cluster, see the documentation on configuring, scaling, monitoring, and upgrading the cluster.
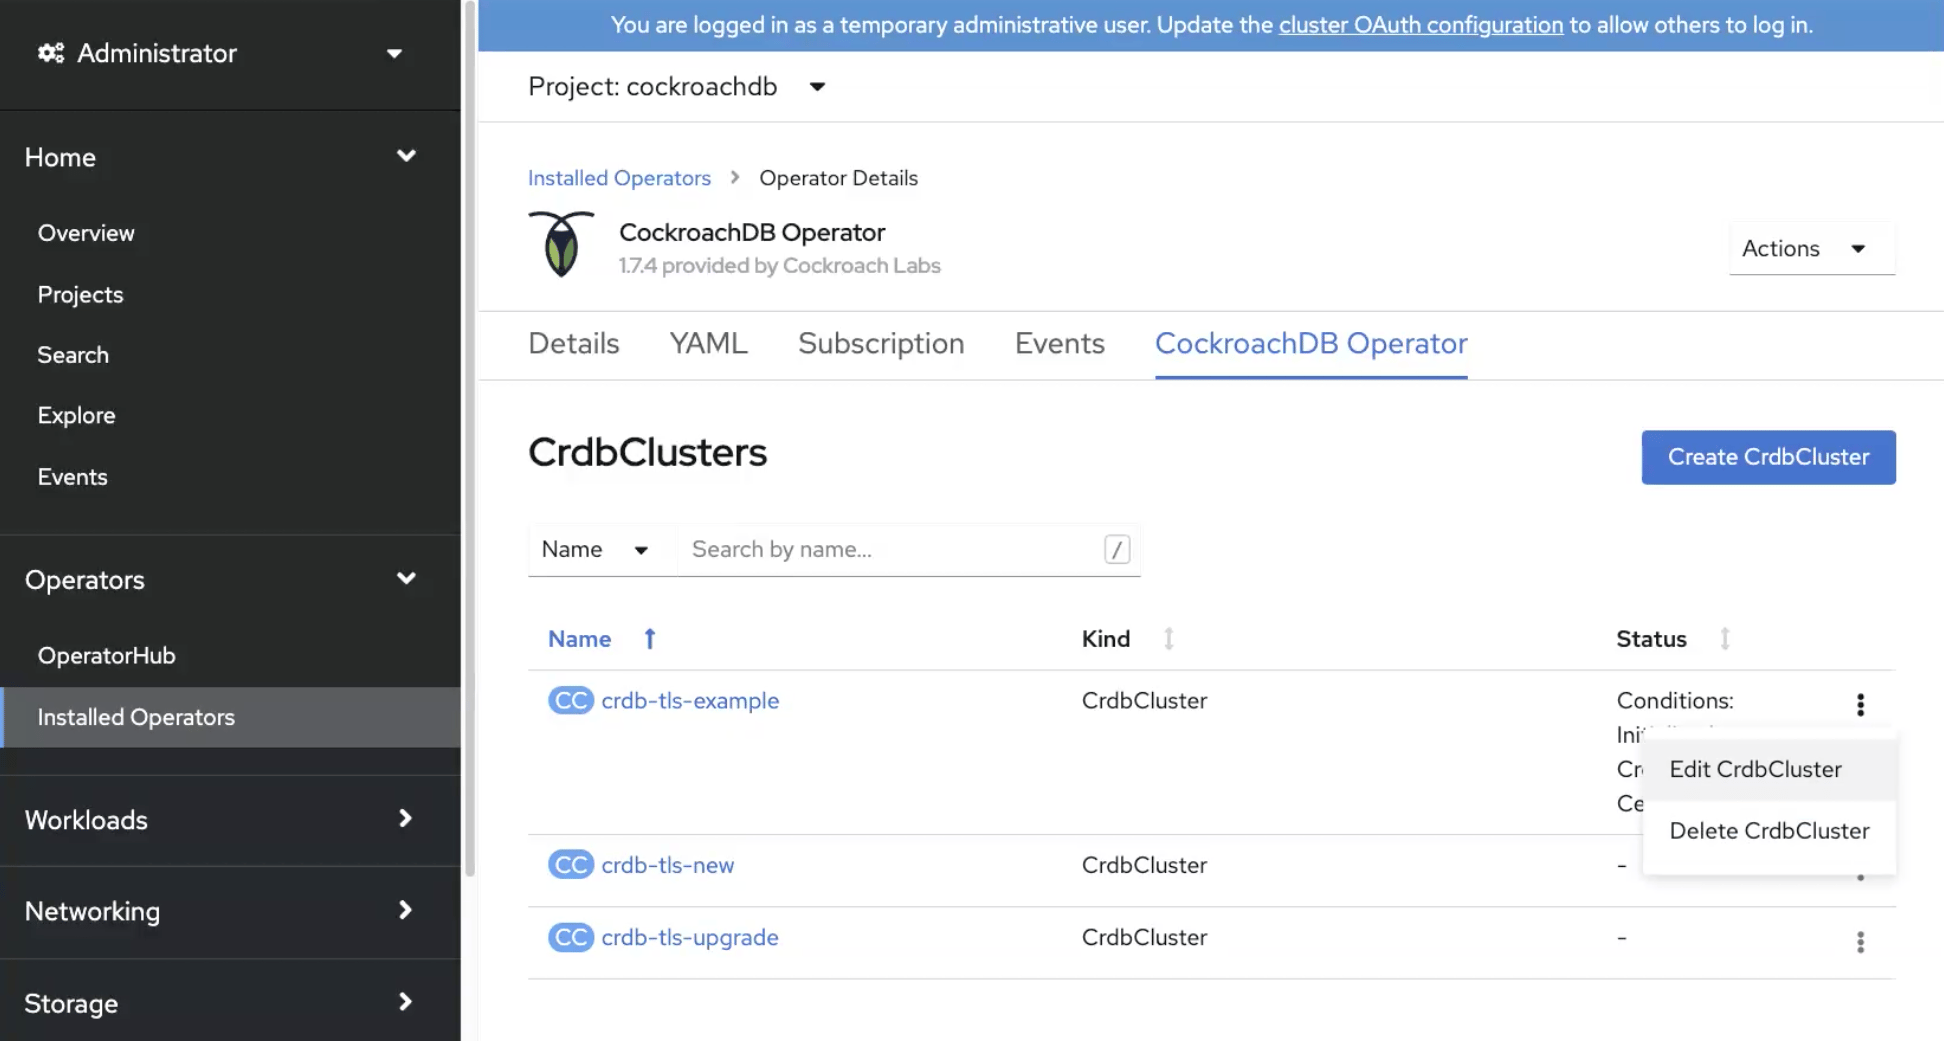
1. Go to the **Installed Operators** page and find the cluster name of the CockroachDB cluster. Select **Delete CrdbCluster** from the menu.
## Step 8. Delete the cluster
If you want to continue using this cluster, see the documentation on configuring, scaling, monitoring, and upgrading the cluster.
1. Go to the **Installed Operators** page and find the cluster name of the CockroachDB cluster. Select **Delete CrdbCluster** from the menu.
 This will delete the CockroachDB cluster being run by the Operator. It will *not* delete:
* The persistent volumes that were attached to the pods. This can be done by deleting the PVCs via **Storage** > **Persistent Volume Claims**.
* The opaque secrets used to authenticate the cluster. This can be done via **Workloads** > **Secrets**.
If you want to delete the persistent volumes and free up the storage used by CockroachDB, be sure you have a backup copy of your data. Data **cannot** be recovered once the persistent volumes are deleted. For more information, see the [Kubernetes documentation](https://kubernetes.io/docs/tasks/run-application/delete-stateful-set/#persistent-volumes).
For more information on managing secrets, see the [Kubernetes documentation](https://kubernetes.io/docs/tasks/configmap-secret/managing-secret-using-kubectl).
This will delete the CockroachDB cluster being run by the Operator. It will *not* delete:
* The persistent volumes that were attached to the pods. This can be done by deleting the PVCs via **Storage** > **Persistent Volume Claims**.
* The opaque secrets used to authenticate the cluster. This can be done via **Workloads** > **Secrets**.
If you want to delete the persistent volumes and free up the storage used by CockroachDB, be sure you have a backup copy of your data. Data **cannot** be recovered once the persistent volumes are deleted. For more information, see the [Kubernetes documentation](https://kubernetes.io/docs/tasks/run-application/delete-stateful-set/#persistent-volumes).
For more information on managing secrets, see the [Kubernetes documentation](https://kubernetes.io/docs/tasks/configmap-secret/managing-secret-using-kubectl).