> ## Documentation Index
> Fetch the complete documentation index at: https://cockroachlabs.mintlify.site/llms.txt
> Use this file to discover all available pages before exploring further.
# Deploy a Local Cluster from Binary (Secure)
export const InternalLink = ({version, path = "", children, ...props}) => {
let detectedVersion = version || "stable";
if (typeof window !== 'undefined' && !version) {
const match = window.location.pathname.match(/\/docs\/([^/]+)/);
if (match) {
detectedVersion = match[1];
}
}
const normalizedPath = path.startsWith("/") ? path.slice(1) : path;
return
{children}
;
};
Once you've installed CockroachDB, it's simple to run a secure multi-node cluster locally, using TLS certificates to encrypt network communication.
To try CockroachDB Cloud instead of running CockroachDB yourself, refer to the Cloud Quickstart.
## Before you begin
* Make sure you have already installed CockroachDB.
* For quick SQL testing or app development, consider running a single-node cluster instead.
* Note that running multiple nodes on a single host is useful for testing CockroachDB, but it's not suitable for production. To run a physically distributed cluster, see Manual Deployment or Orchestrated Deployment, and review the Production Checklist.
## Step 1. Generate certificates
You can use either `cockroach cert` commands or `openssl` commands to generate security certificates. This section features the `cockroach cert` commands.
1. Create two directories:
```shell theme={"theme":{"light":"catppuccin-mocha","dark":"catppuccin-mocha"}}
$ mkdir certs my-safe-directory
```
| Directory | Description |
| ------------------- | ---------------------------------------------------------------------------------------------------------------------- |
| `certs` | You'll generate your CA certificate and all node and client certificates and keys in this directory. |
| `my-safe-directory` | You'll generate your CA key in this directory and then reference the key when generating node and client certificates. |
2. Create the CA (Certificate Authority) certificate and key pair:
```shell theme={"theme":{"light":"catppuccin-mocha","dark":"catppuccin-mocha"}}
$ cockroach cert create-ca \
--certs-dir=certs \
--ca-key=my-safe-directory/ca.key
```
3. Create the certificate and key pair for your nodes:
```shell theme={"theme":{"light":"catppuccin-mocha","dark":"catppuccin-mocha"}}
$ cockroach cert create-node \
localhost \
$(hostname) \
--certs-dir=certs \
--ca-key=my-safe-directory/ca.key
```
Because you're running a local cluster and all nodes use the same hostname (`localhost`), you only need a single node certificate. Note that this is different than running a production cluster, where you would need to generate a certificate and key for each node, issued to all common names and IP addresses you might use to refer to the node as well as to any load balancer instances.
4. Create a client certificate and key pair for the `root` user:
```shell theme={"theme":{"light":"catppuccin-mocha","dark":"catppuccin-mocha"}}
$ cockroach cert create-client \
root \
--certs-dir=certs \
--ca-key=my-safe-directory/ca.key
```
## Step 2. Start the cluster
1. Use the `cockroach start` command to start the first node:
```shell theme={"theme":{"light":"catppuccin-mocha","dark":"catppuccin-mocha"}}
$ cockroach start \
--certs-dir=certs \
--store=node1 \
--listen-addr=localhost:26257 \
--http-addr=localhost:8080 \
--join=localhost:26257,localhost:26258,localhost:26259
```
You'll see a message like the following:
```text theme={"theme":{"light":"catppuccin-mocha","dark":"catppuccin-mocha"}}
*
* INFO: initial startup completed.
* Node will now attempt to join a running cluster, or wait for `cockroach init`.
* Client connections will be accepted after this completes successfully.
* Check the log file(s) for progress.
*
```
2. Take a moment to understand the flags you used:
* The `--certs-dir` directory points to the directory holding certificates and keys.
* Since this is a purely local cluster, `--listen-addr=localhost:26257` and `--http-addr=localhost:8080` tell the node to listen only on `localhost`, with port `26257` used for internal and client traffic and port `8080` used for HTTP requests from the DB Console.
* The `--store` flag indicates the location where the node's data and logs are stored.
* The `--join` flag specifies the addresses and ports of the nodes that will initially comprise your cluster. You'll use this exact `--join` flag when starting other nodes as well.
For a cluster in a single region, set 3-5 `--join` addresses. Each starting node will attempt to contact one of the join hosts. In case a join host cannot be reached, the node will try another address on the list until it can join the gossip network.
3. In separate terminal windows, start two more nodes:
```shell theme={"theme":{"light":"catppuccin-mocha","dark":"catppuccin-mocha"}}
$ cockroach start \
--certs-dir=certs \
--store=node2 \
--listen-addr=localhost:26258 \
--http-addr=localhost:8081 \
--join=localhost:26257,localhost:26258,localhost:26259
```
```shell theme={"theme":{"light":"catppuccin-mocha","dark":"catppuccin-mocha"}}
$ cockroach start \
--certs-dir=certs \
--store=node3 \
--listen-addr=localhost:26259 \
--http-addr=localhost:8082 \
--join=localhost:26257,localhost:26258,localhost:26259
```
These commands are the same as before but with unique `--store`, `--listen-addr`, and `--http-addr` flags.
4. Use the `cockroach init` command to perform a one-time initialization of the cluster, sending the request to any node on the `--join` list:
```shell theme={"theme":{"light":"catppuccin-mocha","dark":"catppuccin-mocha"}}
$ cockroach init --certs-dir=certs --host=localhost:26257
```
You'll see the following message:
```text theme={"theme":{"light":"catppuccin-mocha","dark":"catppuccin-mocha"}}
Cluster successfully initialized
```
At this point, each node also prints helpful startup details to its log. For example, the following command retrieves node 1's startup details:
```shell theme={"theme":{"light":"catppuccin-mocha","dark":"catppuccin-mocha"}}
$ grep 'node starting' node1/logs/cockroach.log -A 11
```
The output will look something like this:
```text theme={"theme":{"light":"catppuccin-mocha","dark":"catppuccin-mocha"}}
CockroachDB node starting at
build: CCL v25.2.15 @ 2026-03-09 00:00:00 (go1.12.6)
webui: https://localhost:8080
sql: postgresql://root@localhost:26257?sslcert=certs%2Fclient.root.crt&sslkey=certs%2Fclient.root.key&sslmode=verify-full&sslrootcert=certs%2Fca.crt
RPC client flags: cockroach --host=localhost:26257 --certs-dir=certs
logs: /Users/`cockroach sql` command against node 1:
```shell theme={"theme":{"light":"catppuccin-mocha","dark":"catppuccin-mocha"}}
$ cockroach sql --certs-dir=certs --host=localhost:26257
```
2. Run some basic CockroachDB SQL statements:
```sql theme={"theme":{"light":"catppuccin-mocha","dark":"catppuccin-mocha"}}
> CREATE DATABASE bank;
```
```sql theme={"theme":{"light":"catppuccin-mocha","dark":"catppuccin-mocha"}}
> CREATE TABLE bank.accounts (id INT PRIMARY KEY, balance DECIMAL);
```
```sql theme={"theme":{"light":"catppuccin-mocha","dark":"catppuccin-mocha"}}
> INSERT INTO bank.accounts VALUES (1, 1000.50);
```
```sql theme={"theme":{"light":"catppuccin-mocha","dark":"catppuccin-mocha"}}
> SELECT * FROM bank.accounts;
```
```text theme={"theme":{"light":"catppuccin-mocha","dark":"catppuccin-mocha"}}
id | balance
+----+---------+
1 | 1000.50
(1 row)
```
3. Now exit the SQL shell on node 1 and open a new shell on node 2:
```sql theme={"theme":{"light":"catppuccin-mocha","dark":"catppuccin-mocha"}}
> \q
```
```shell theme={"theme":{"light":"catppuccin-mocha","dark":"catppuccin-mocha"}}
$ cockroach sql --certs-dir=certs --host=localhost:26258
```
In a real deployment, all nodes would likely use the default port `26257`, and so you wouldn't need to set the port portion of `--host`.
4. Run the same `SELECT` query as before:
```sql theme={"theme":{"light":"catppuccin-mocha","dark":"catppuccin-mocha"}}
> SELECT * FROM bank.accounts;
```
```text theme={"theme":{"light":"catppuccin-mocha","dark":"catppuccin-mocha"}}
id | balance
+----+---------+
1 | 1000.50
(1 row)
```
As you can see, node 1 and node 2 behaved identically as SQL gateways.
5. Now create a user with a password, which you will need to [access the DB Console](#step-5-access-the-db-console):
```sql theme={"theme":{"light":"catppuccin-mocha","dark":"catppuccin-mocha"}}
> CREATE USER max WITH PASSWORD 'roach';
```
6. Exit the SQL shell on node 2:
```sql theme={"theme":{"light":"catppuccin-mocha","dark":"catppuccin-mocha"}}
> \q
```
## Step 4. Run a sample workload
CockroachDB also comes with a number of built-in workloads for simulating client traffic. Let's run the workload based on CockroachDB's sample vehicle-sharing application, MovR.
1. Load the initial dataset:
```shell theme={"theme":{"light":"catppuccin-mocha","dark":"catppuccin-mocha"}}
$ cockroach workload init movr \
'postgresql://root@localhost:26257?sslcert=certs%2Fclient.root.crt&sslkey=certs%2Fclient.root.key&sslmode=verify-full&sslrootcert=certs%2Fca.crt'
```
```text theme={"theme":{"light":"catppuccin-mocha","dark":"catppuccin-mocha"}}
I190926 16:50:35.663708 1 workload/workloadsql/dataload.go:135 imported users (0s, 50 rows)
I190926 16:50:35.682583 1 workload/workloadsql/dataload.go:135 imported vehicles (0s, 15 rows)
I190926 16:50:35.769572 1 workload/workloadsql/dataload.go:135 imported rides (0s, 500 rows)
I190926 16:50:35.836619 1 workload/workloadsql/dataload.go:135 imported vehicle_location_histories (0s, 1000 rows)
I190926 16:50:35.915498 1 workload/workloadsql/dataload.go:135 imported promo_codes (0s, 1000 rows)
```
2. Run the workload for 5 minutes:
```shell theme={"theme":{"light":"catppuccin-mocha","dark":"catppuccin-mocha"}}
$ cockroach workload run movr \
--duration=5m \
'postgresql://root@localhost:26257?sslcert=certs%2Fclient.root.crt&sslkey=certs%2Fclient.root.key&sslmode=verify-full&sslrootcert=certs%2Fca.crt'
```
## Step 5. Access the DB Console
The CockroachDB DB Console gives you insight into the overall health of your cluster as well as the performance of the client workload.
1. On secure clusters, certain pages of the DB Console can only be accessed by `admin` users.
Run the `cockroach sql` command against node 1:
```shell theme={"theme":{"light":"catppuccin-mocha","dark":"catppuccin-mocha"}}
$ cockroach sql --certs-dir=certs --host=localhost:26257
```
2. Assign `max` to the `admin` role (you only need to do this once):
```sql theme={"theme":{"light":"catppuccin-mocha","dark":"catppuccin-mocha"}}
> GRANT admin TO max;
```
3. Exit the SQL shell:
```sql theme={"theme":{"light":"catppuccin-mocha","dark":"catppuccin-mocha"}}
> \q
```
4. Go to [https://localhost:8080](https://localhost:8080/). Note that your browser will consider the CockroachDB-created certificate invalid; you'll need to click through a warning message to get to the UI.
If you are using Google Chrome, and you are getting an error about not being able to reach `localhost` because its certificate has been revoked, go to [chrome://flags/#allow-insecure-localhost](chrome://flags/#allow-insecure-localhost), enable "Allow invalid certificates for resources loaded from localhost", and then restart the browser. Enabling this Chrome feature degrades security for all sites running on `localhost`, not just CockroachDB's DB Console, so be sure to enable the feature only temporarily.
5. Log in with the username and password you created earlier (`max`/`roach`).
6. On the **Cluster Overview**, notice that three nodes are live, with an identical replica count on each node:
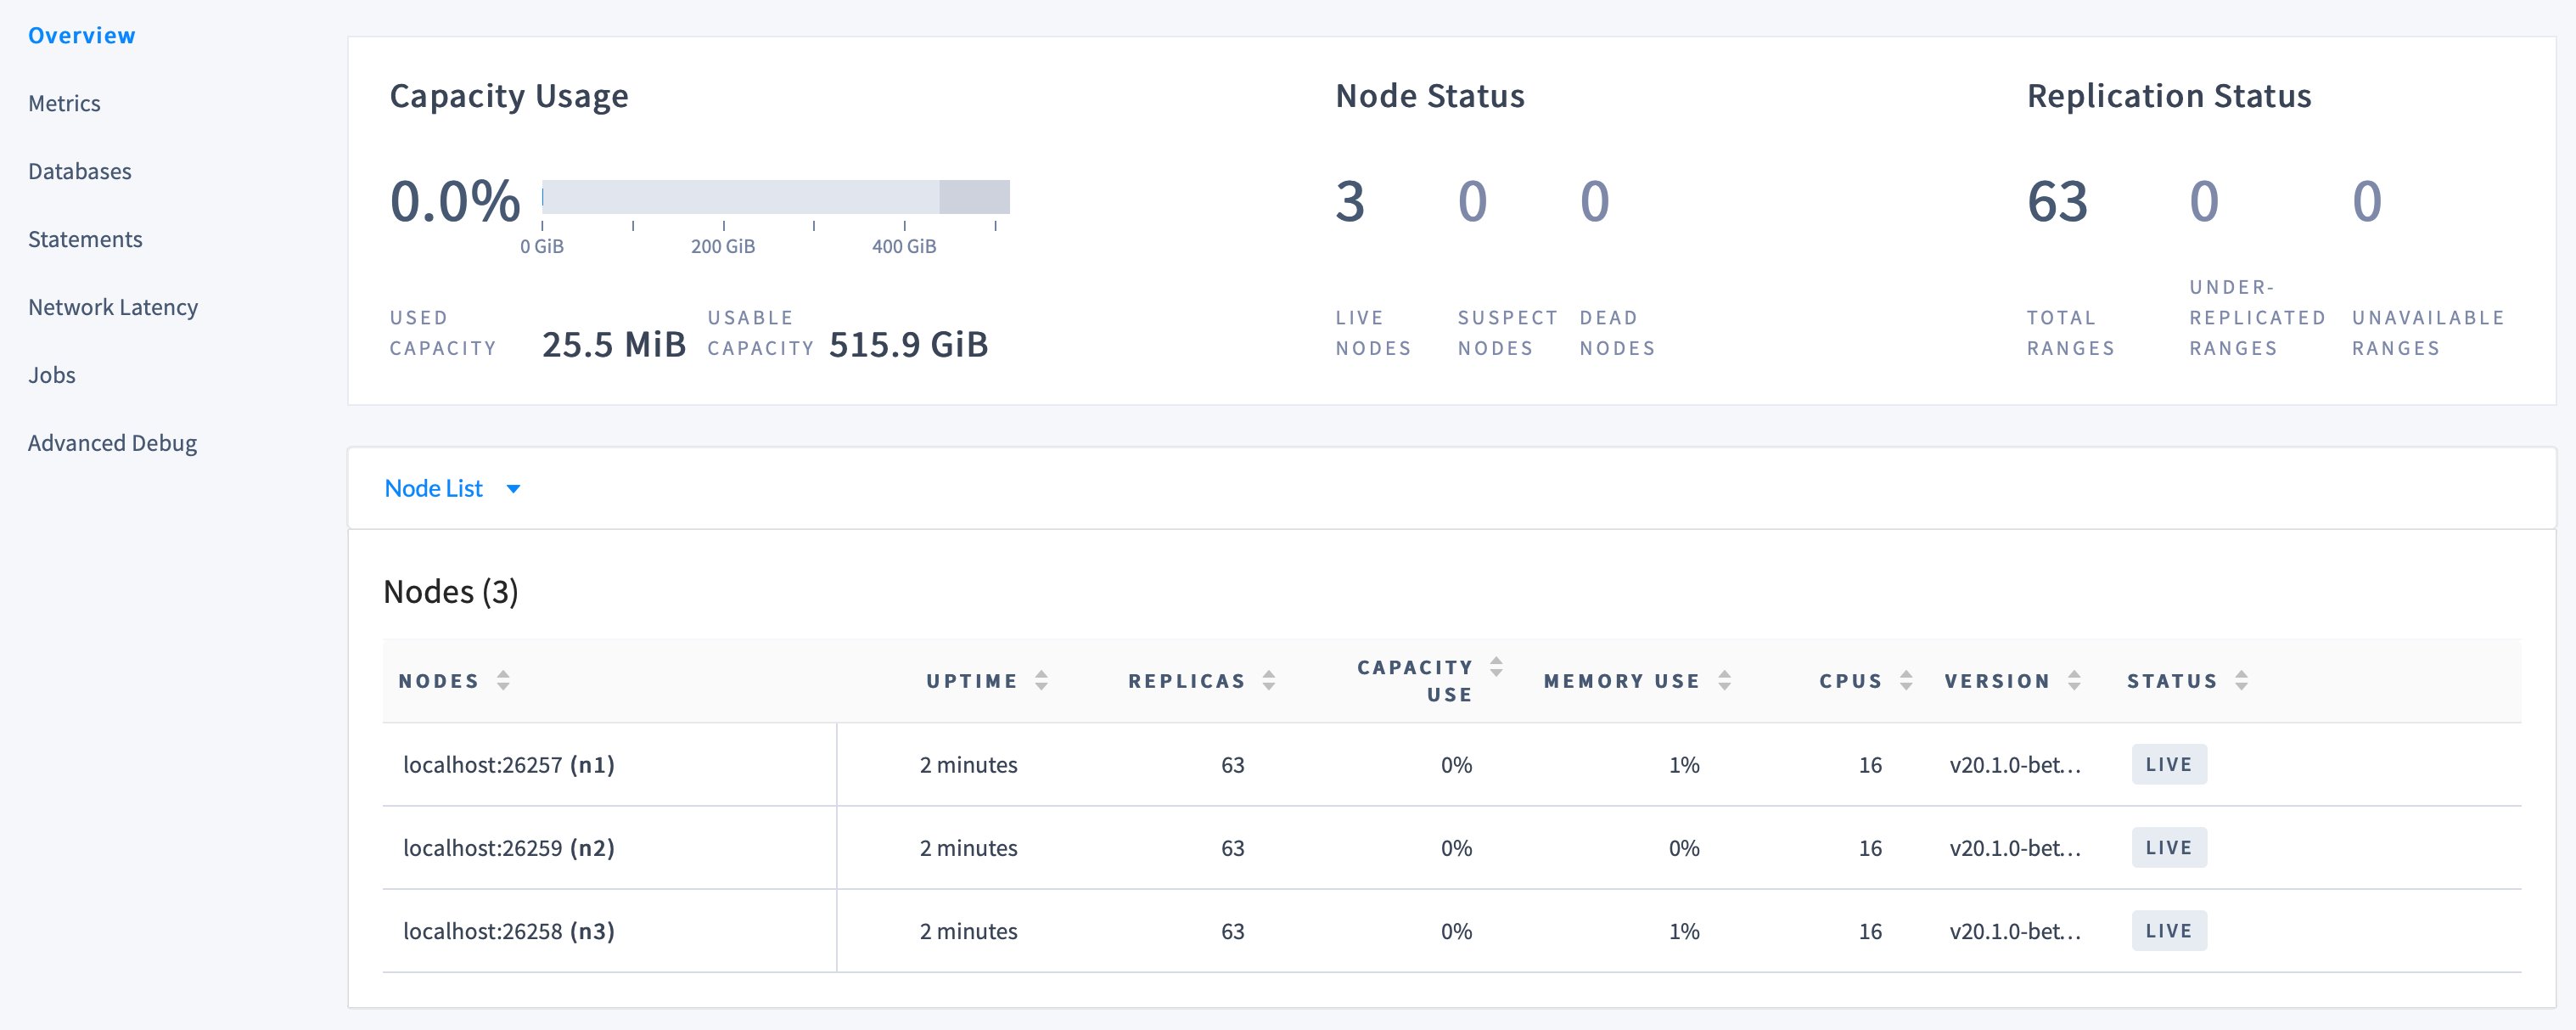 This demonstrates CockroachDB's automated replication of data via the Raft consensus protocol.
Capacity metrics can be incorrect when running multiple nodes on a single machine. For more details, see this limitation.
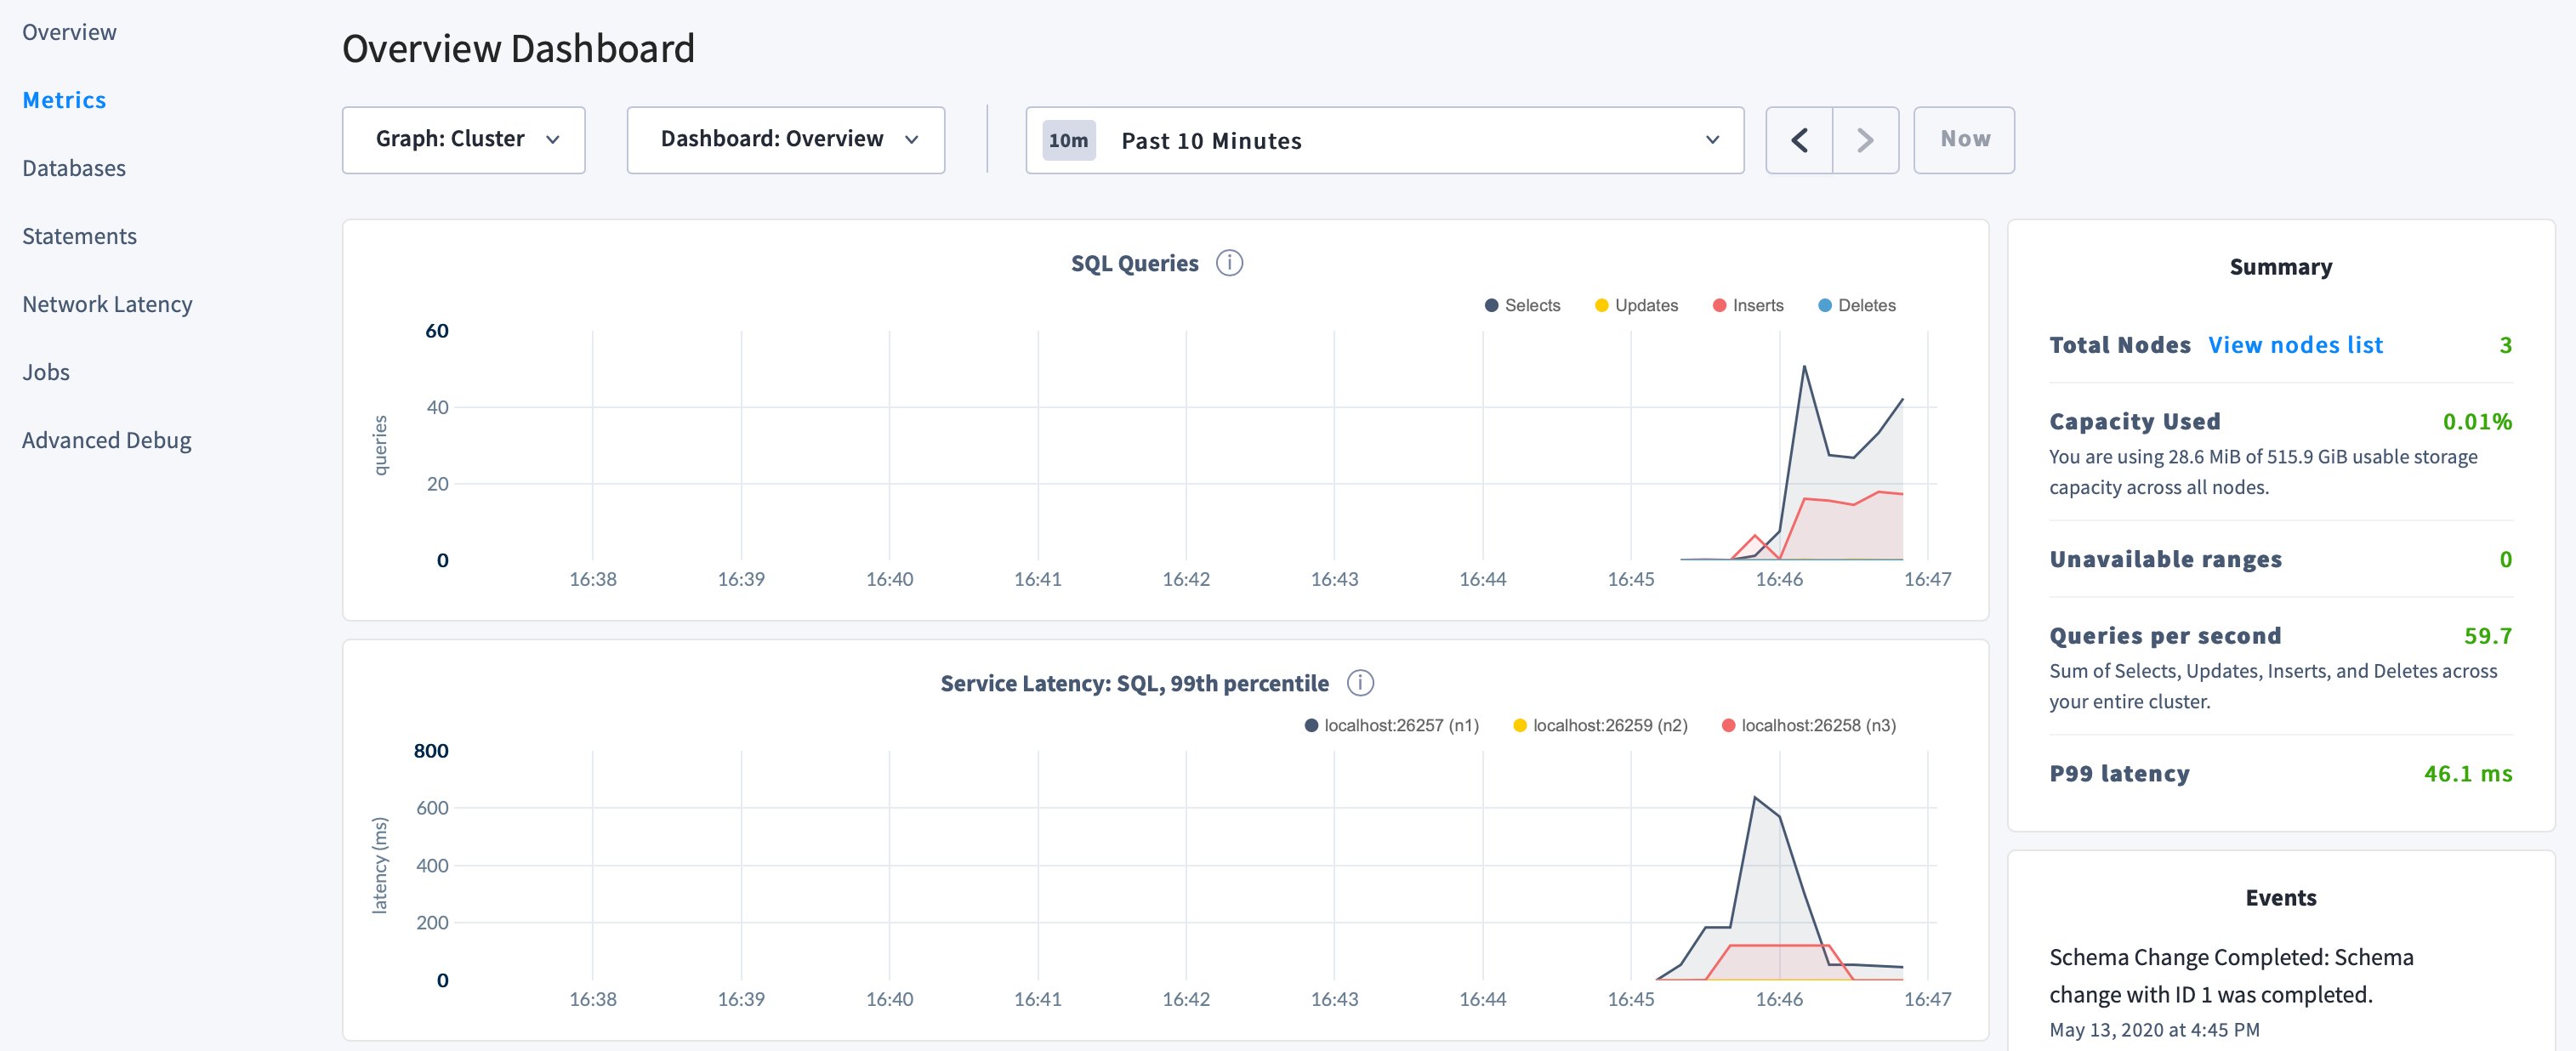
7. Click **Metrics** to access a variety of time series dashboards, including graphs of SQL queries and service latency over time:
This demonstrates CockroachDB's automated replication of data via the Raft consensus protocol.
Capacity metrics can be incorrect when running multiple nodes on a single machine. For more details, see this limitation.
7. Click **Metrics** to access a variety of time series dashboards, including graphs of SQL queries and service latency over time:
 8. Use the **Databases**, **Statements**, and **Jobs** pages to view details about your databases and tables, to assess the performance of specific queries, and to monitor the status of long-running operations like schema changes, respectively.
## Step 6. Simulate node maintenance
1. In a new terminal, gracefully shut down a node. This is normally done prior to node maintenance:
Get the process IDs of the nodes:
```shell theme={"theme":{"light":"catppuccin-mocha","dark":"catppuccin-mocha"}}
ps -ef | grep cockroach | grep -v grep
```
```text theme={"theme":{"light":"catppuccin-mocha","dark":"catppuccin-mocha"}}
501 4482 1 0 2:41PM ttys000 0:09.78 cockroach start --certs-dir=certs --store=node1 --listen-addr=localhost:26257 --http-addr=localhost:8080 --join=localhost:26257,localhost:26258,localhost:26259
501 4497 1 0 2:41PM ttys000 0:08.54 cockroach start --certs-dir=certs --store=node2 --listen-addr=localhost:26258 --http-addr=localhost:8081 --join=localhost:26257,localhost:26258,localhost:26259
501 4503 1 0 2:41PM ttys000 0:08.54 cockroach start --certs-dir=certs --store=node3 --listen-addr=localhost:26259 --http-addr=localhost:8082 --join=localhost:26257,localhost:26258,localhost:26259
```
Gracefully shut down node 3, specifying its process ID:
```shell theme={"theme":{"light":"catppuccin-mocha","dark":"catppuccin-mocha"}}
kill -TERM 4503
```
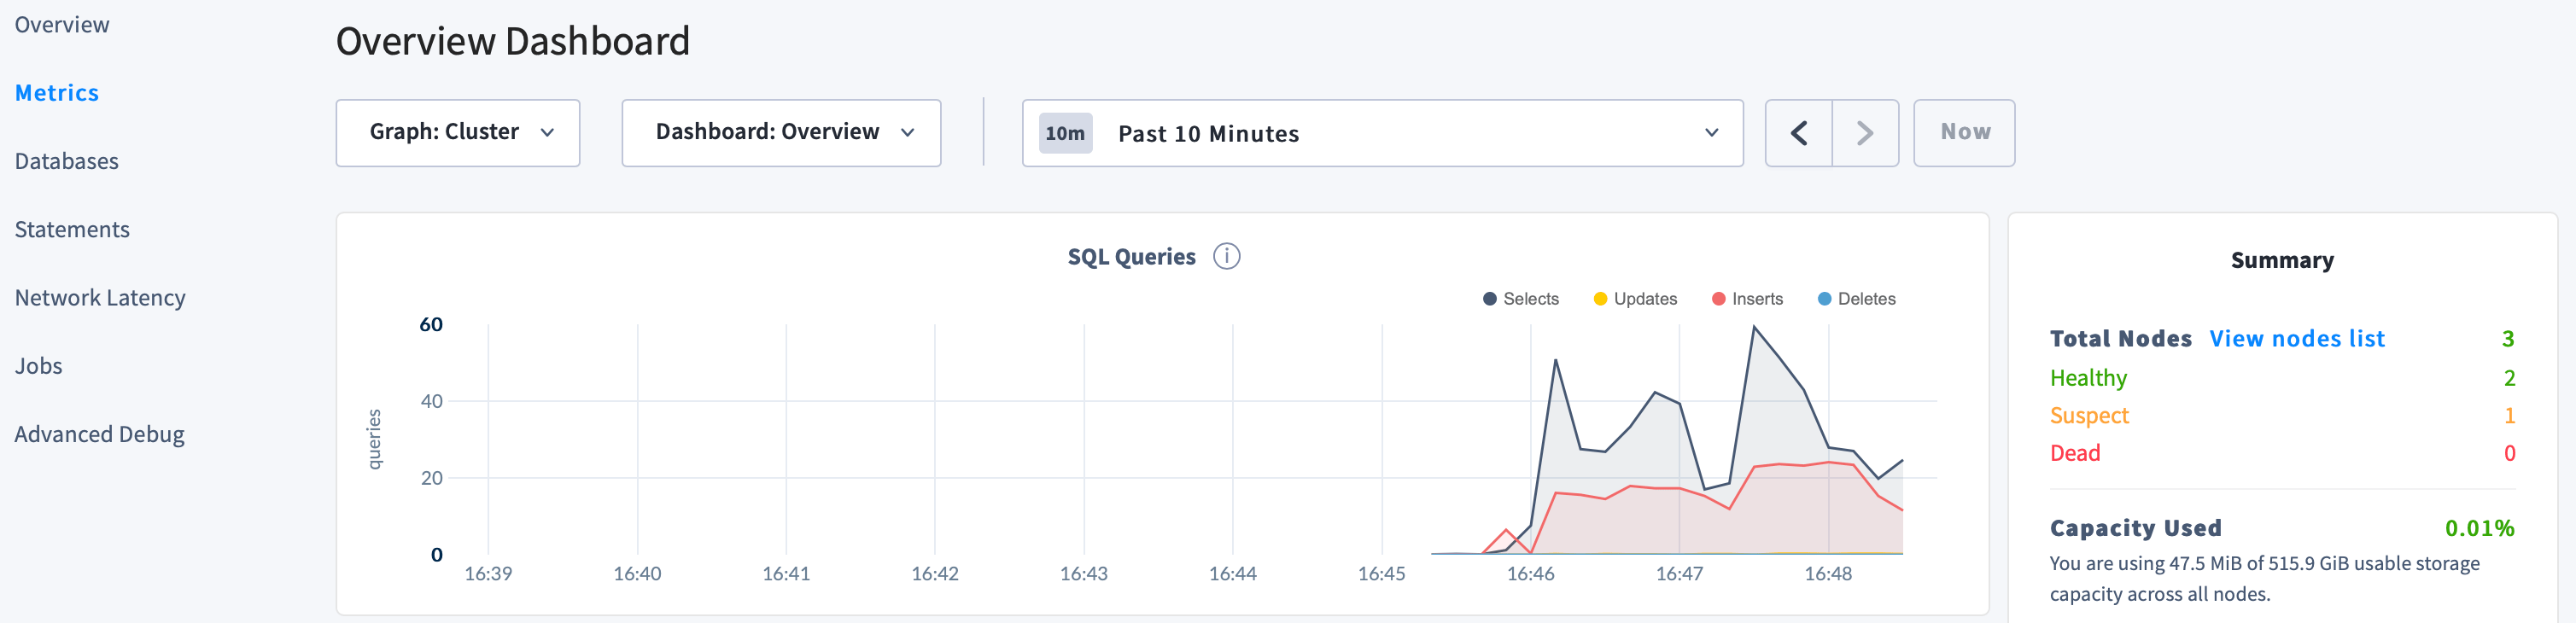
2. Back in the DB Console, despite one node being "suspect", notice the continued SQL traffic:
8. Use the **Databases**, **Statements**, and **Jobs** pages to view details about your databases and tables, to assess the performance of specific queries, and to monitor the status of long-running operations like schema changes, respectively.
## Step 6. Simulate node maintenance
1. In a new terminal, gracefully shut down a node. This is normally done prior to node maintenance:
Get the process IDs of the nodes:
```shell theme={"theme":{"light":"catppuccin-mocha","dark":"catppuccin-mocha"}}
ps -ef | grep cockroach | grep -v grep
```
```text theme={"theme":{"light":"catppuccin-mocha","dark":"catppuccin-mocha"}}
501 4482 1 0 2:41PM ttys000 0:09.78 cockroach start --certs-dir=certs --store=node1 --listen-addr=localhost:26257 --http-addr=localhost:8080 --join=localhost:26257,localhost:26258,localhost:26259
501 4497 1 0 2:41PM ttys000 0:08.54 cockroach start --certs-dir=certs --store=node2 --listen-addr=localhost:26258 --http-addr=localhost:8081 --join=localhost:26257,localhost:26258,localhost:26259
501 4503 1 0 2:41PM ttys000 0:08.54 cockroach start --certs-dir=certs --store=node3 --listen-addr=localhost:26259 --http-addr=localhost:8082 --join=localhost:26257,localhost:26258,localhost:26259
```
Gracefully shut down node 3, specifying its process ID:
```shell theme={"theme":{"light":"catppuccin-mocha","dark":"catppuccin-mocha"}}
kill -TERM 4503
```
2. Back in the DB Console, despite one node being "suspect", notice the continued SQL traffic:
 3. Restart node 3:
```shell theme={"theme":{"light":"catppuccin-mocha","dark":"catppuccin-mocha"}}
$ cockroach start \
--certs-dir=certs \
--store=node3 \
--listen-addr=localhost:26259 \
--http-addr=localhost:8082 \
--join=localhost:26257,localhost:26258,localhost:26259
```
## Step 7. Scale the cluster
Adding capacity is as simple as starting more nodes with `cockroach start`.
1. In separate terminal windows, start 2 more nodes:
```shell theme={"theme":{"light":"catppuccin-mocha","dark":"catppuccin-mocha"}}
$ cockroach start \
--certs-dir=certs \
--store=node4 \
--listen-addr=localhost:26260 \
--http-addr=localhost:8083 \
--join=localhost:26257,localhost:26258,localhost:26259
```
```shell theme={"theme":{"light":"catppuccin-mocha","dark":"catppuccin-mocha"}}
$ cockroach start \
--certs-dir=certs \
--store=node5 \
--listen-addr=localhost:26261 \
--http-addr=localhost:8084 \
--join=localhost:26257,localhost:26258,localhost:26259
```
Again, these commands are the same as before but with unique `--store`, `--listen-addr`, and `--http-addr` flags.
2. Back on the **Cluster Overview** in the DB Console, you'll now see 5 nodes listed:
3. Restart node 3:
```shell theme={"theme":{"light":"catppuccin-mocha","dark":"catppuccin-mocha"}}
$ cockroach start \
--certs-dir=certs \
--store=node3 \
--listen-addr=localhost:26259 \
--http-addr=localhost:8082 \
--join=localhost:26257,localhost:26258,localhost:26259
```
## Step 7. Scale the cluster
Adding capacity is as simple as starting more nodes with `cockroach start`.
1. In separate terminal windows, start 2 more nodes:
```shell theme={"theme":{"light":"catppuccin-mocha","dark":"catppuccin-mocha"}}
$ cockroach start \
--certs-dir=certs \
--store=node4 \
--listen-addr=localhost:26260 \
--http-addr=localhost:8083 \
--join=localhost:26257,localhost:26258,localhost:26259
```
```shell theme={"theme":{"light":"catppuccin-mocha","dark":"catppuccin-mocha"}}
$ cockroach start \
--certs-dir=certs \
--store=node5 \
--listen-addr=localhost:26261 \
--http-addr=localhost:8084 \
--join=localhost:26257,localhost:26258,localhost:26259
```
Again, these commands are the same as before but with unique `--store`, `--listen-addr`, and `--http-addr` flags.
2. Back on the **Cluster Overview** in the DB Console, you'll now see 5 nodes listed:
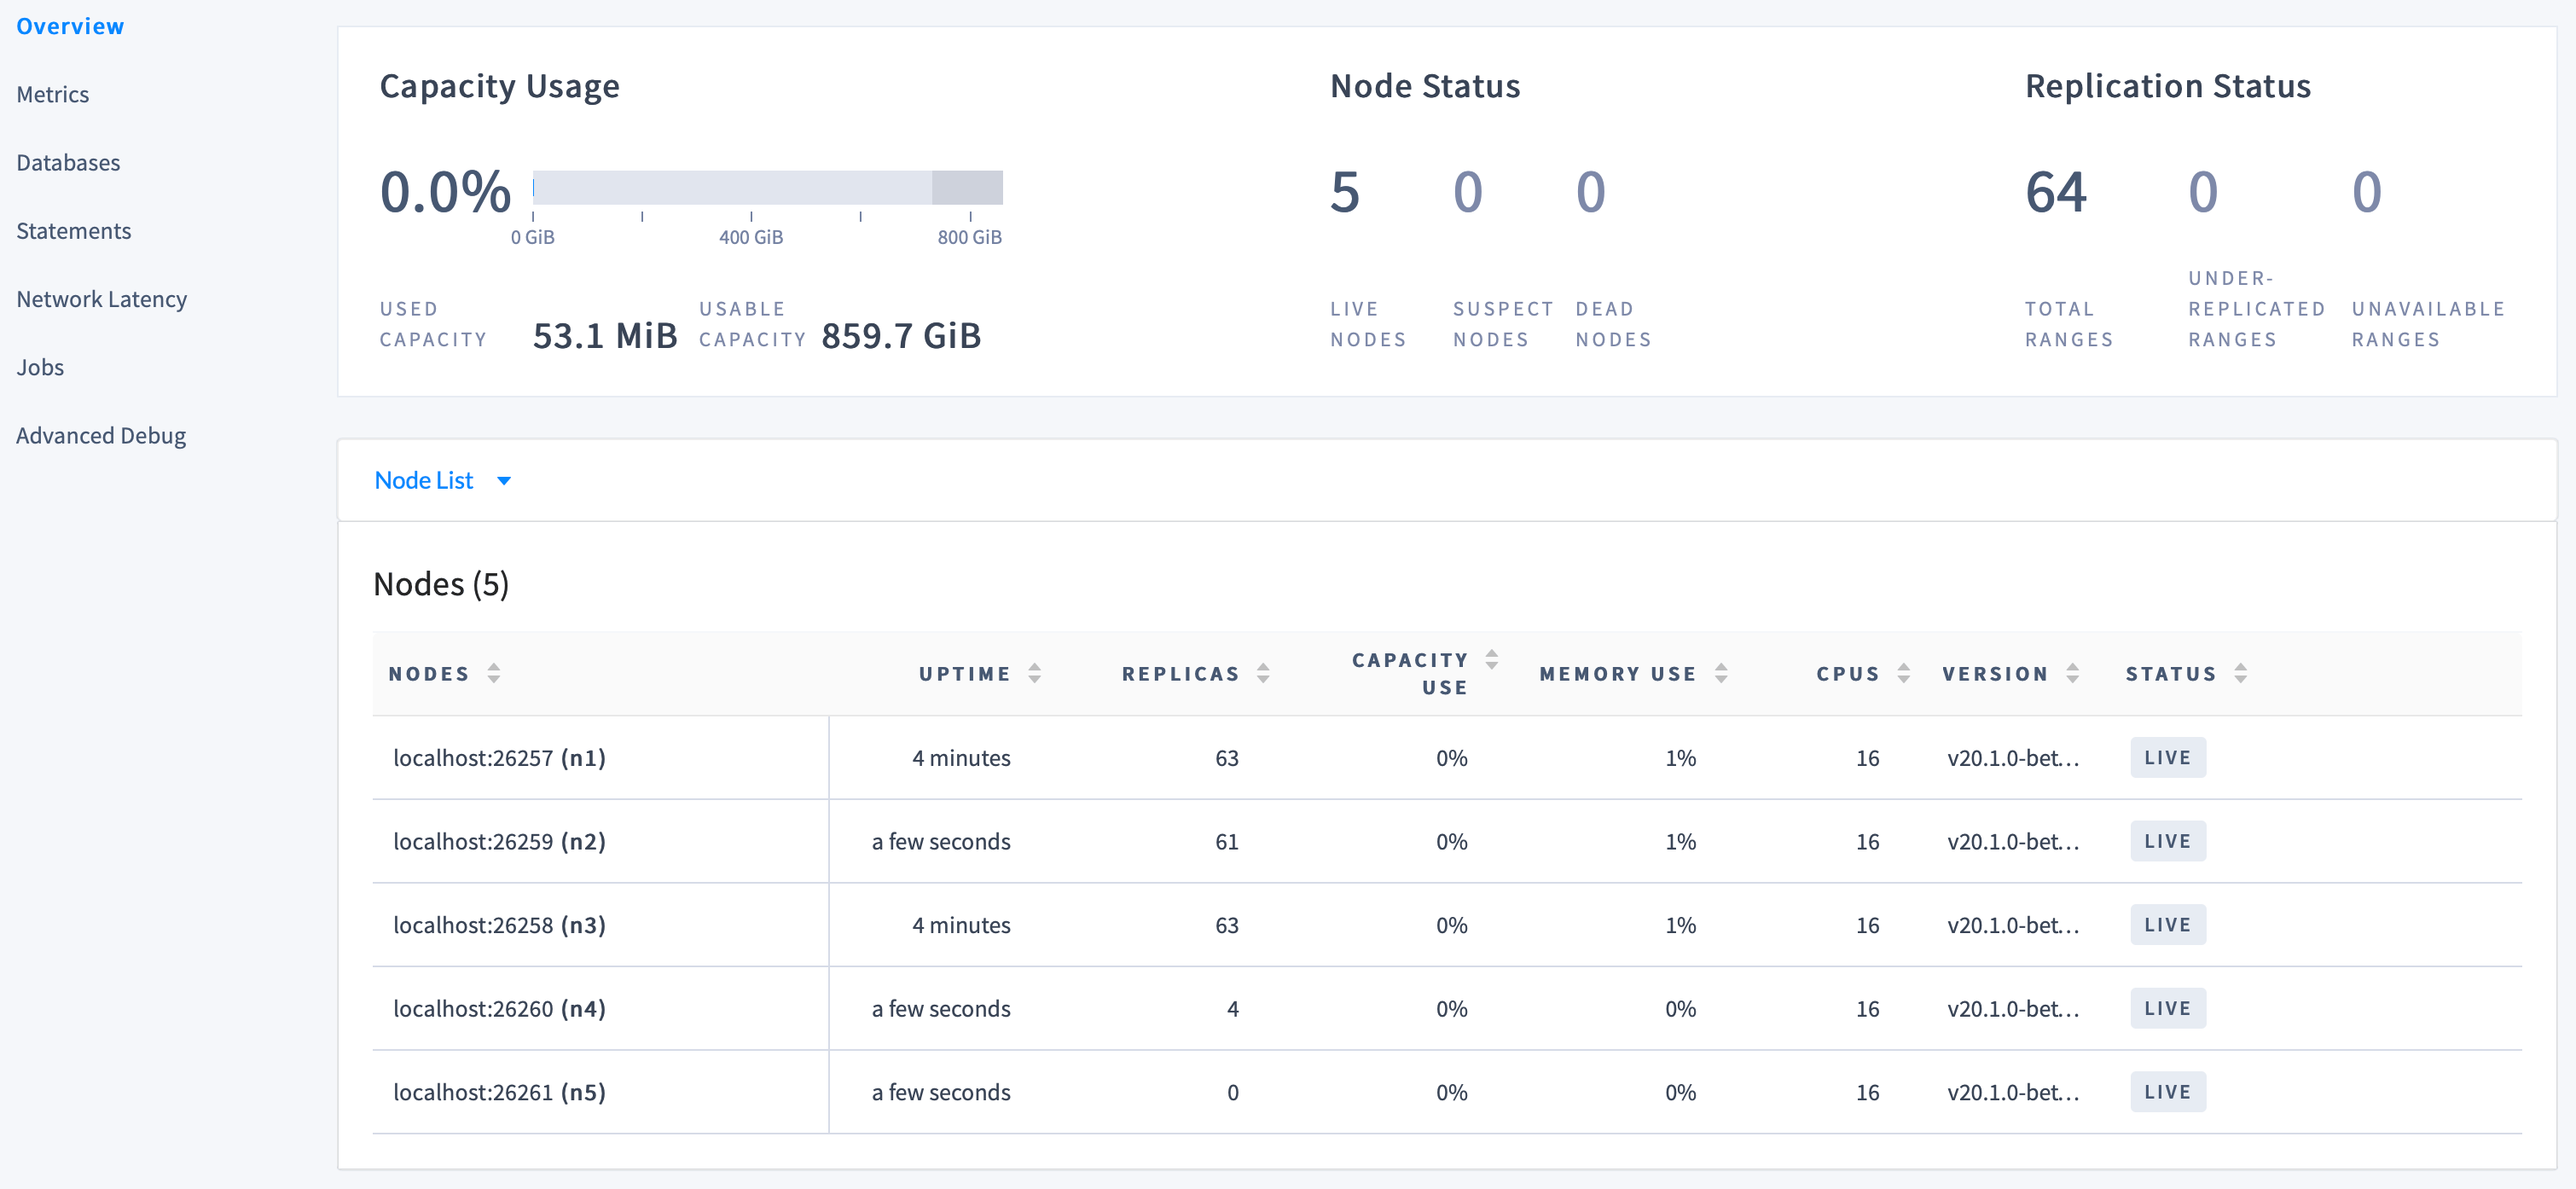 At first, the replica count will be lower for nodes 4 and 5. Very soon, however, you'll see those numbers even out across all nodes, indicating that data is being automatically rebalanced to utilize the additional capacity of the new nodes.
## Step 8. Stop the cluster
1. When you're done with your test cluster, stop the nodes.
Get the process IDs of the nodes:
```shell theme={"theme":{"light":"catppuccin-mocha","dark":"catppuccin-mocha"}}
ps -ef | grep cockroach | grep -v grep
```
```text theme={"theme":{"light":"catppuccin-mocha","dark":"catppuccin-mocha"}}
501 4482 1 0 2:41PM ttys000 0:09.78 cockroach start --certs-dir=certs --store=node1 --listen-addr=localhost:26257 --http-addr=localhost:8080 --join=localhost:26257,localhost:26258,localhost:26259
501 4497 1 0 2:41PM ttys000 0:08.54 cockroach start --certs-dir=certs --store=node2 --listen-addr=localhost:26258 --http-addr=localhost:8081 --join=localhost:26257,localhost:26258,localhost:26259
501 4503 1 0 2:41PM ttys000 0:08.54 cockroach start --certs-dir=certs --store=node3 --listen-addr=localhost:26259 --http-addr=localhost:8082 --join=localhost:26257,localhost:26258,localhost:26259
501 4510 1 0 2:42PM ttys000 0:08.46 cockroach start --certs-dir=certs --store=node4 --listen-addr=localhost:26260 --http-addr=localhost:8083 --join=localhost:26257,localhost:26258,localhost:26259
501 4622 1 0 2:43PM ttys000 0:02.51 cockroach start --certs-dir=certs --store=node5 --listen-addr=localhost:26261 --http-addr=localhost:8084 --join=localhost:26257,localhost:26258,localhost:26259
```
Gracefully shut down each node, specifying its process ID:
```shell theme={"theme":{"light":"catppuccin-mocha","dark":"catppuccin-mocha"}}
kill -TERM 4482
```
```shell theme={"theme":{"light":"catppuccin-mocha","dark":"catppuccin-mocha"}}
kill -TERM 4497
```
```shell theme={"theme":{"light":"catppuccin-mocha","dark":"catppuccin-mocha"}}
kill -TERM 4503
```
For `node4` and `node5`, the shutdown process will take longer (about a minute each) and will eventually force the nodes to stop. Because only two of the five nodes are now running, the cluster has lost quorum and is no longer operational.
```shell theme={"theme":{"light":"catppuccin-mocha","dark":"catppuccin-mocha"}}
kill -TERM 4510
```
```shell theme={"theme":{"light":"catppuccin-mocha","dark":"catppuccin-mocha"}}
kill -TERM 4622
```
2. To restart the cluster at a later time, run the same `cockroach start` commands as earlier from the directory containing the nodes' data stores.
3. If you do not plan to restart the cluster, you may want to remove the nodes' data stores and the certificate directories:
```shell theme={"theme":{"light":"catppuccin-mocha","dark":"catppuccin-mocha"}}
$ rm -rf node1 node2 node3 node4 node5 certs my-safe-directory
```
## What's next?
* Install the client driver for your preferred language
* Learn more about CockroachDB SQL and the built-in SQL client
* Further explore CockroachDB capabilities like fault tolerance and automated repair, multi-region performance, serializable transactions, and JSON support
You might also be interested in the following pages:
* CockroachDB SQL client
* Example Apps
At first, the replica count will be lower for nodes 4 and 5. Very soon, however, you'll see those numbers even out across all nodes, indicating that data is being automatically rebalanced to utilize the additional capacity of the new nodes.
## Step 8. Stop the cluster
1. When you're done with your test cluster, stop the nodes.
Get the process IDs of the nodes:
```shell theme={"theme":{"light":"catppuccin-mocha","dark":"catppuccin-mocha"}}
ps -ef | grep cockroach | grep -v grep
```
```text theme={"theme":{"light":"catppuccin-mocha","dark":"catppuccin-mocha"}}
501 4482 1 0 2:41PM ttys000 0:09.78 cockroach start --certs-dir=certs --store=node1 --listen-addr=localhost:26257 --http-addr=localhost:8080 --join=localhost:26257,localhost:26258,localhost:26259
501 4497 1 0 2:41PM ttys000 0:08.54 cockroach start --certs-dir=certs --store=node2 --listen-addr=localhost:26258 --http-addr=localhost:8081 --join=localhost:26257,localhost:26258,localhost:26259
501 4503 1 0 2:41PM ttys000 0:08.54 cockroach start --certs-dir=certs --store=node3 --listen-addr=localhost:26259 --http-addr=localhost:8082 --join=localhost:26257,localhost:26258,localhost:26259
501 4510 1 0 2:42PM ttys000 0:08.46 cockroach start --certs-dir=certs --store=node4 --listen-addr=localhost:26260 --http-addr=localhost:8083 --join=localhost:26257,localhost:26258,localhost:26259
501 4622 1 0 2:43PM ttys000 0:02.51 cockroach start --certs-dir=certs --store=node5 --listen-addr=localhost:26261 --http-addr=localhost:8084 --join=localhost:26257,localhost:26258,localhost:26259
```
Gracefully shut down each node, specifying its process ID:
```shell theme={"theme":{"light":"catppuccin-mocha","dark":"catppuccin-mocha"}}
kill -TERM 4482
```
```shell theme={"theme":{"light":"catppuccin-mocha","dark":"catppuccin-mocha"}}
kill -TERM 4497
```
```shell theme={"theme":{"light":"catppuccin-mocha","dark":"catppuccin-mocha"}}
kill -TERM 4503
```
For `node4` and `node5`, the shutdown process will take longer (about a minute each) and will eventually force the nodes to stop. Because only two of the five nodes are now running, the cluster has lost quorum and is no longer operational.
```shell theme={"theme":{"light":"catppuccin-mocha","dark":"catppuccin-mocha"}}
kill -TERM 4510
```
```shell theme={"theme":{"light":"catppuccin-mocha","dark":"catppuccin-mocha"}}
kill -TERM 4622
```
2. To restart the cluster at a later time, run the same `cockroach start` commands as earlier from the directory containing the nodes' data stores.
3. If you do not plan to restart the cluster, you may want to remove the nodes' data stores and the certificate directories:
```shell theme={"theme":{"light":"catppuccin-mocha","dark":"catppuccin-mocha"}}
$ rm -rf node1 node2 node3 node4 node5 certs my-safe-directory
```
## What's next?
* Install the client driver for your preferred language
* Learn more about CockroachDB SQL and the built-in SQL client
* Further explore CockroachDB capabilities like fault tolerance and automated repair, multi-region performance, serializable transactions, and JSON support
You might also be interested in the following pages:
* CockroachDB SQL client
* Example Apps