
Watch the demo
Step 1. Install prerequisites
In this tutorial, you’ll use CockroachDB, its built-inycsb workload, and the HAProxy load balancer. Before you begin, make sure these applications are installed:
- Install the latest version of .
- Install HAProxy. If you’re on a Mac and using Homebrew, use
brew install haproxy.
mkdir cloud-migration) and start all your nodes in that directory.
Step 2. Start a 3-node cluster on “cloud 1”
If you’ve already , the commands for starting nodes should be familiar to you. The new flag to note is , which accepts key-value pairs that describe the topography of a node. In this case, you’re using the flag to specify that the first 3 nodes are running on cloud 1. In a new terminal, start node 1 on cloud 1:Step 3. Initialize the cluster
In a new terminal, use the command to perform a one-time initialization of the cluster:Step 4. Set up HAProxy load balancing
You’re now running 3 nodes in a simulated cloud. Each of these nodes is an equally suitable SQL gateway to your cluster, but to ensure an even balancing of client requests across these nodes, you can use a TCP load balancer. Let’s use the open-source HAProxy load balancer that you installed earlier. In a new terminal, run the command, specifying the port of any node:haproxy.cfg file automatically configured to work with the 3 nodes of your running cluster. In the file, change bind :26257 to bind :26000. This changes the port on which HAProxy accepts requests to a port that is not already in use by a node and that will not be used by the nodes you’ll add later.
-f flag pointing to the haproxy.cfg file:
Step 5. Run a sample workload
Now that you have a load balancer running in front of your cluster, lets use the YCSB workload built into CockroachDB to simulate multiple client connections, each performing mixed read/write workloads.-
In a new terminal, load the initial
ycsbschema and data, pointing it at HAProxy’s port: -
Run the
ycsbworkload, pointing it at HAProxy’s port:This command initiates 10 concurrent client workloads for 20 minutes, but limits the total load to 1000 operations per second (since you’re running everything on a single machine). You’ll soon see per-operation statistics print to standard output every second:
Step 6. Watch data balance across all 3 nodes
Now open the DB Console athttp://localhost:8080 and click Metrics in the left-hand navigation bar. The Overview dashboard is displayed. Hover over the SQL Queries graph at the top. After a minute or so, you’ll see that the load generator is executing approximately 95% reads and 5% writes across all nodes.
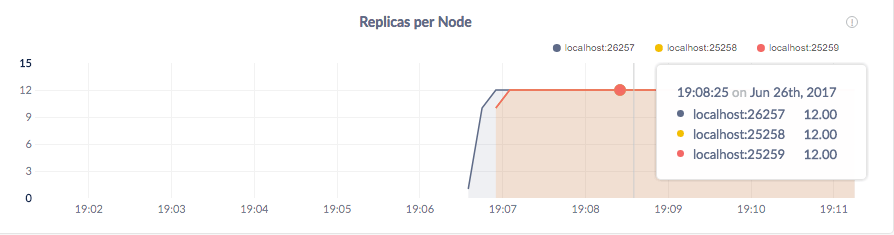
Scroll down a bit and hover over the Replicas per Node graph. Because CockroachDB replicates each piece of data 3 times by default, the replica count on each of your 3 nodes should be identical:
Step 7. Add 3 nodes on “cloud 2”
At this point, you’re running three nodes on cloud 1. But what if you’d like to start experimenting with resources provided by another cloud vendor? Let’s try that by adding three more nodes to a new cloud platform. Again, the flag to note is , which you’re using to specify that these next 3 nodes are running on cloud 2. In a new terminal, start node 4 on cloud 2:Step 8. Watch data balance across all 6 nodes
Back on the Overview dashboard in DB Console, hover over the Replicas per Node graph again. Because you used to specify that nodes are running on 2 clouds, you’ll see an approximately even number of replicas on each node, indicating that CockroachDB has automatically rebalanced replicas across both simulated clouds: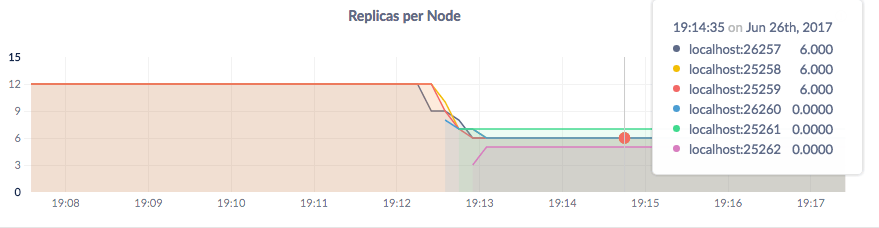
Step 9. Migrate all data to “cloud 2”
So your cluster is replicating across two simulated clouds. But let’s say that after experimentation, you’re happy with cloud vendor 2, and you decide that you’d like to move everything there. Can you do that without interruption to your live client traffic? Yes, and it’s as simple as running a single command to add a that all replicas must be on nodes with--locality=cloud=2.
In a new terminal, :
Step 10. Verify the data migration
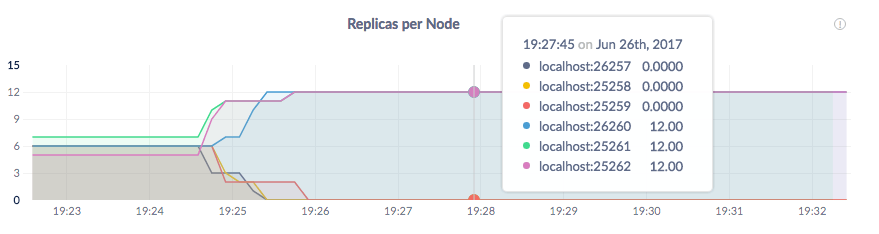
Back on the Overview dashboard in the DB Console, hover over the Replicas per Node graph again. Very soon, you’ll see the replica count double on nodes 4, 5, and 6 and drop to 0 on nodes 1, 2, and 3: